
Implementing Parametrizable Shortcut Actions for your iOS Apps
Published on
All the way back to 2016, a group of very talented iOS developers released Workflow, a very popular app to let users create actions of different kinds within the system’s constraints. You could create and automate different tasks, such as controlling a server via SSH, downloading all the images from a website, and more… Much, much more.
Apple saw the power of the app and acquired it in March 2017. This was very exciting, but we didn’t hear anything from the app since. Until WWDC 2018. Apple revealed a new app: Shortcuts. This app was built on top of Workflow, and as an Apple app, it allowed it to do many things that Workflow just wasn’t allowed to do, such as toggling system settings, integrating it with other apps (!!), and it was also natively integrated into Siri.
This was in iOS 12, and as the initial release of Shortcuts, it was still very limited. Developers could integrate Shortcuts into their apps, but they were limited and there was no way to parametrize them.
In iOS 13, the Shortcuts app is now better than ever. And developers can now create actions that permit users to customize them. This allows them to create powerful shortcuts, with your action serving as a functional organ in them.
**Note**
A Shortcut is made of Actions. A shortcut executes a series of Actions to get to a result. Apps can expose different actions to Siri and the Shortcuts app.
You can go beyond want to creating simple shortcuts: you can create conversational Siri actions. This is very cool, because allows Siri to respond differently depending on how the user replies to her queries.
In this article, we will create a few actions with parameters to explain how the system works, so you can start writing your own parametrizable actions for your own apps. The sample project we created will be attached at the end of this article.
Thinking About Parametrized Shortcuts.
You may be wondering why parametrized shortcuts are useful. Prior to iOS 13, we could get similar behavior to parametrized shortcuts by leveraging the clipboard to move data inside and outside your action.
With parametrized shortcuts, you can think of them as if they were functions - the traditional functions you know from the programming world. A function is a black box which takes input (parameters) and produces some output.
This way, you can let users pass in variables or results from other actions into your own action, operate on it, and optionally produce an output.
Implementing Parametrized Shortcuts in Your iOS App.
We will create a few parametrized shortcuts that allow you do basic math operations. Along the way, we will modify the shortcuts to show what kind of features you can implement.
Project Setup
The setup is the same as it is in iOS 12, so feel to skip this section if your app already uses the Intents extension.
To add these type of shortcuts in your App, you will need to add the Siri capability in your Signing & Capabilities tab of your main app’s target. You will also need to add a new Target of type Intents Extension (File -> New -> Target -> Intents Extension). This will also link against the SiriKit framework.
Creating the Intent Definition File
Next, you need to add a intentdefinition file and share it across all your targets. To do this, right-click your project blueprint on the Navigator and select “Add New File”. Search for “SiriKit Intent Definition File” and click Next. Finally, on the Inspector, add it to all your Targets.
if you have done this prior to iOS 13, prepare to see a lot of changes here.
An Intent is a definition of something users could want to do. If you want to create an action to let users add two numbers, that action is an Intent. There’s a bunch of pre-defined intents provided by the system, such as Messages, Photo Search, and more, but we will not be talking about them today.
Now that you have created the intentdefinition file, you can start working on your Shortcuts.
This file allows you to structure your shortcuts and to create all the custom types involved in their execution. Here, you can define what variables take part of your Actions. You can define the combinations of variables allowed, default values for them, constraints, and more. You structure your actions in Intents, which have variables, and you can configure them as you see fit.
Creating Intents.
Open the intentdefinition, scroll to the bottom, of the left pane, click the “+” button, and select New Intent.
We will create the Intent to add two numbers together.
For now, copy the following configuration. I’m just showing the configuration for firstNumber, but you need to do the same thing for secondNumber:
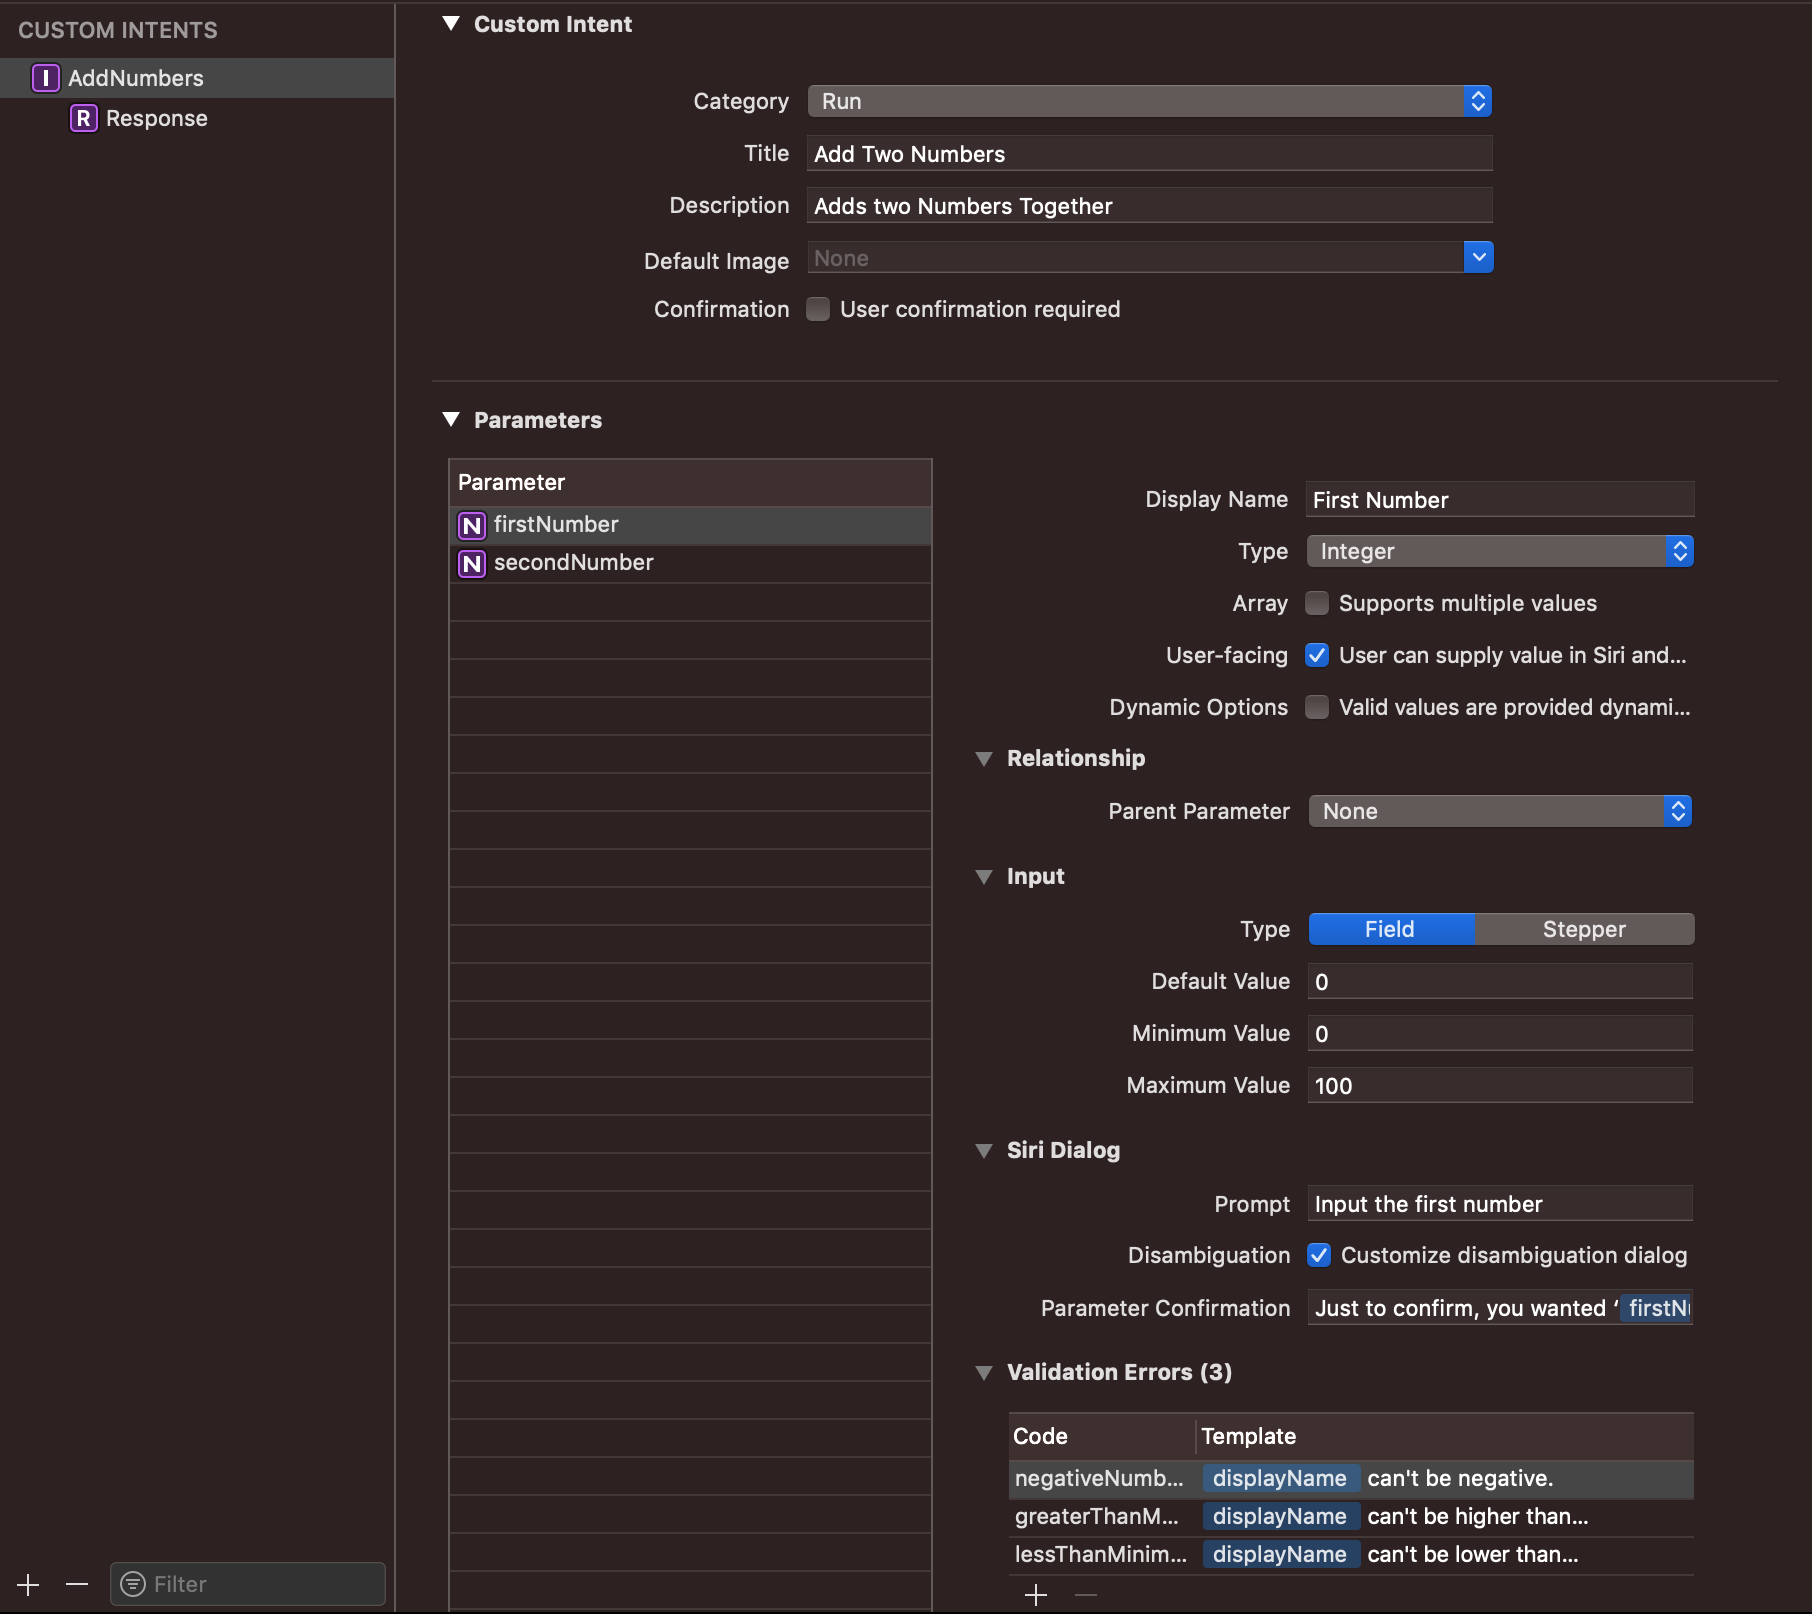
Before we move on, let’s talk about the different configurations each action can take.
Intents Configuration
Basic Configuration and Variable Configuration
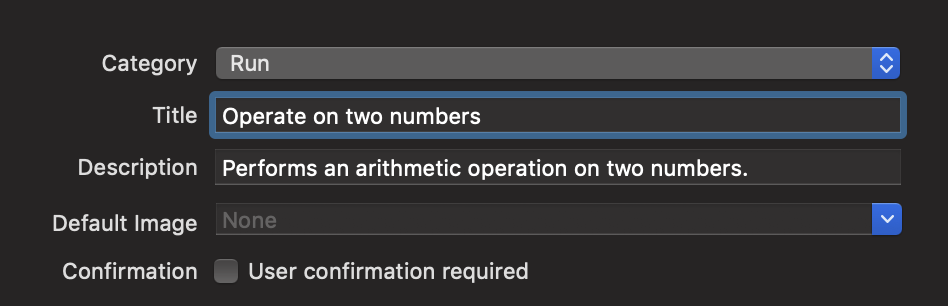
The Category is a way to classify your action. This helps the system organize the entire actions from across all the apps into categories. We use the Generic Run category here, because it’s hard to categorize in a different way.
The Title is the title of the action in the Shortcuts app. The Description is a small description of the action. You can write what it does and show short instructions to explain your users how to use it.

You can also set a default image, and whether the user should always be asked before running the Shortcut.
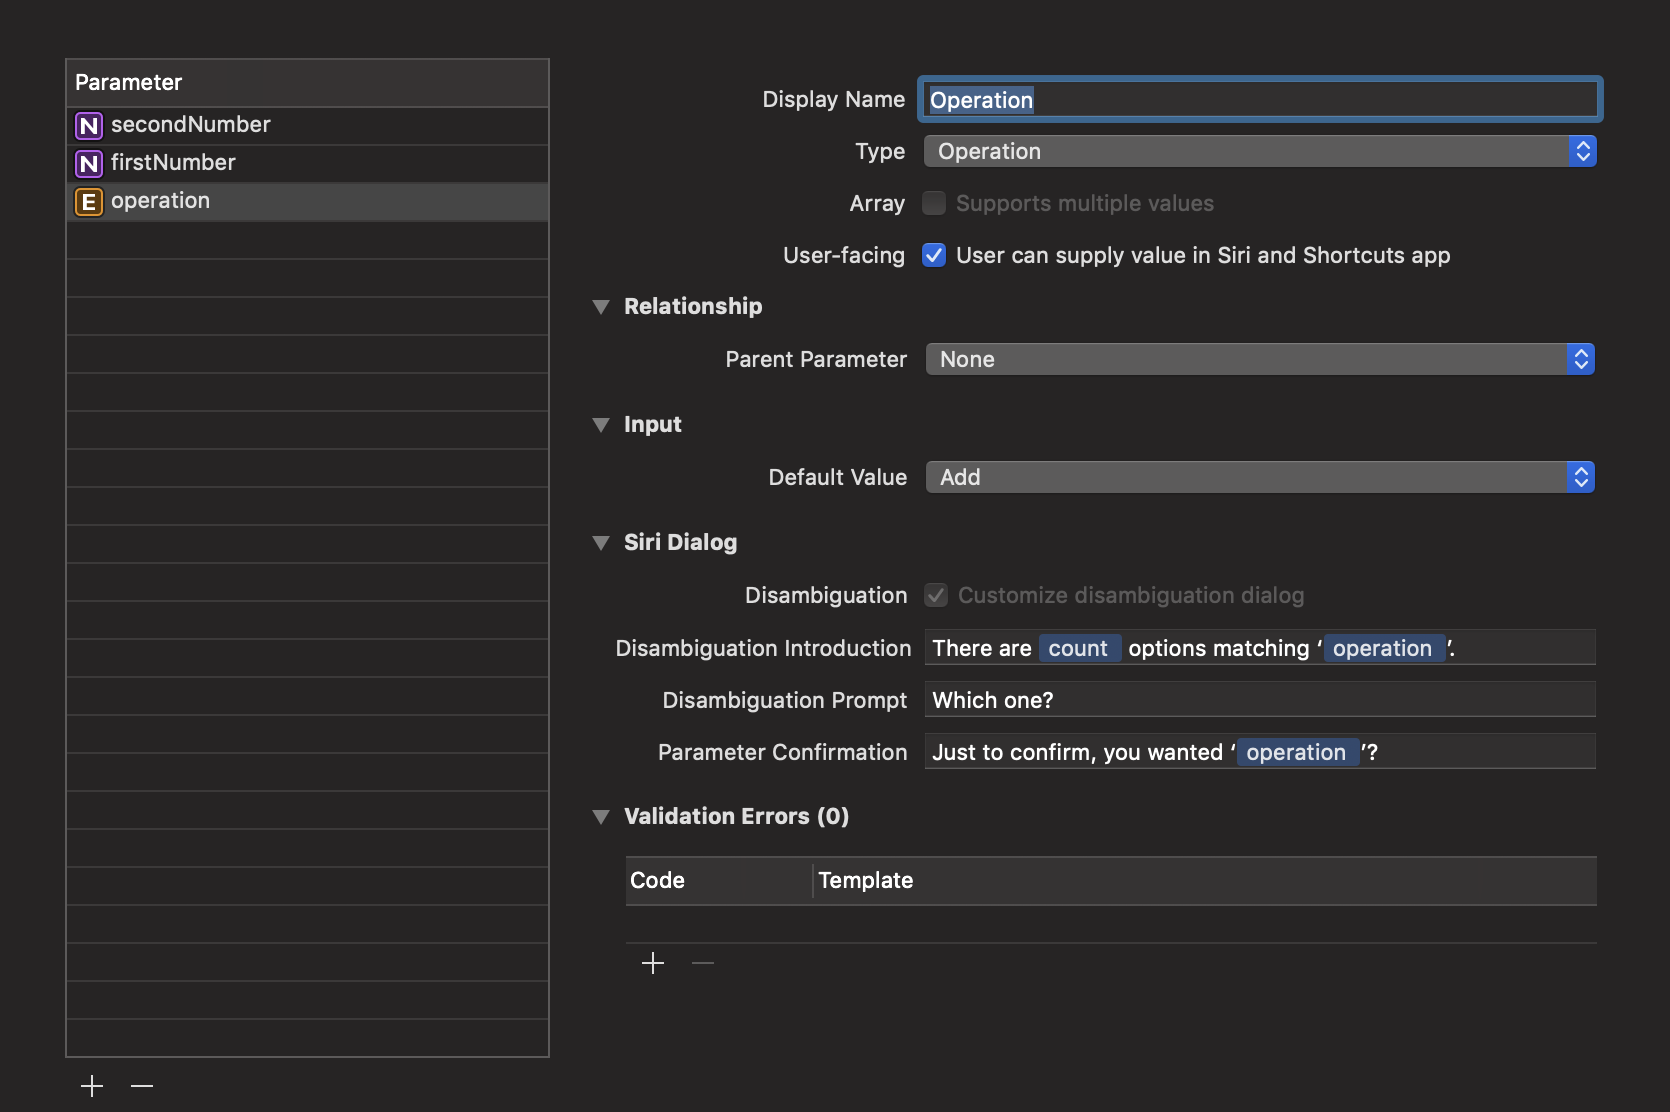
Next, you configure the variables themselves. They are nicely named “Parameters” in the UI. The user will see the Display Name of the parameter in the Shortcuts Action UI. The Type defines what kind of parameter it is (String, Int, a custom type as an enum, etc). You can also pass in a list of these numbers (so you could create an action that adds all the numbers in a list, for example).
The User-Facing option is what allows the user to customize the action in Shortcuts. If you disable this, users cannot supply their own values.
The Dynamic Options constraints the variable to a pre defined list of values. The user cannot provide this value if it’s checked.
In the Relationship section, we can define a Parent Variable. With this variable, you can choose whether to show this variable or not to the user depending on the value of the parent.
Now that all the configurations starting on Relationship are only accesible if you have the User-Facing box checked.
The Input section allows to define the UI and constraints for our values. The configurations here are self-explanatory: In case of Integers, you can decide if you want a textfield or stepper to let your end user interact with your action, or and you can set max, min, and a default value for that particular variable.
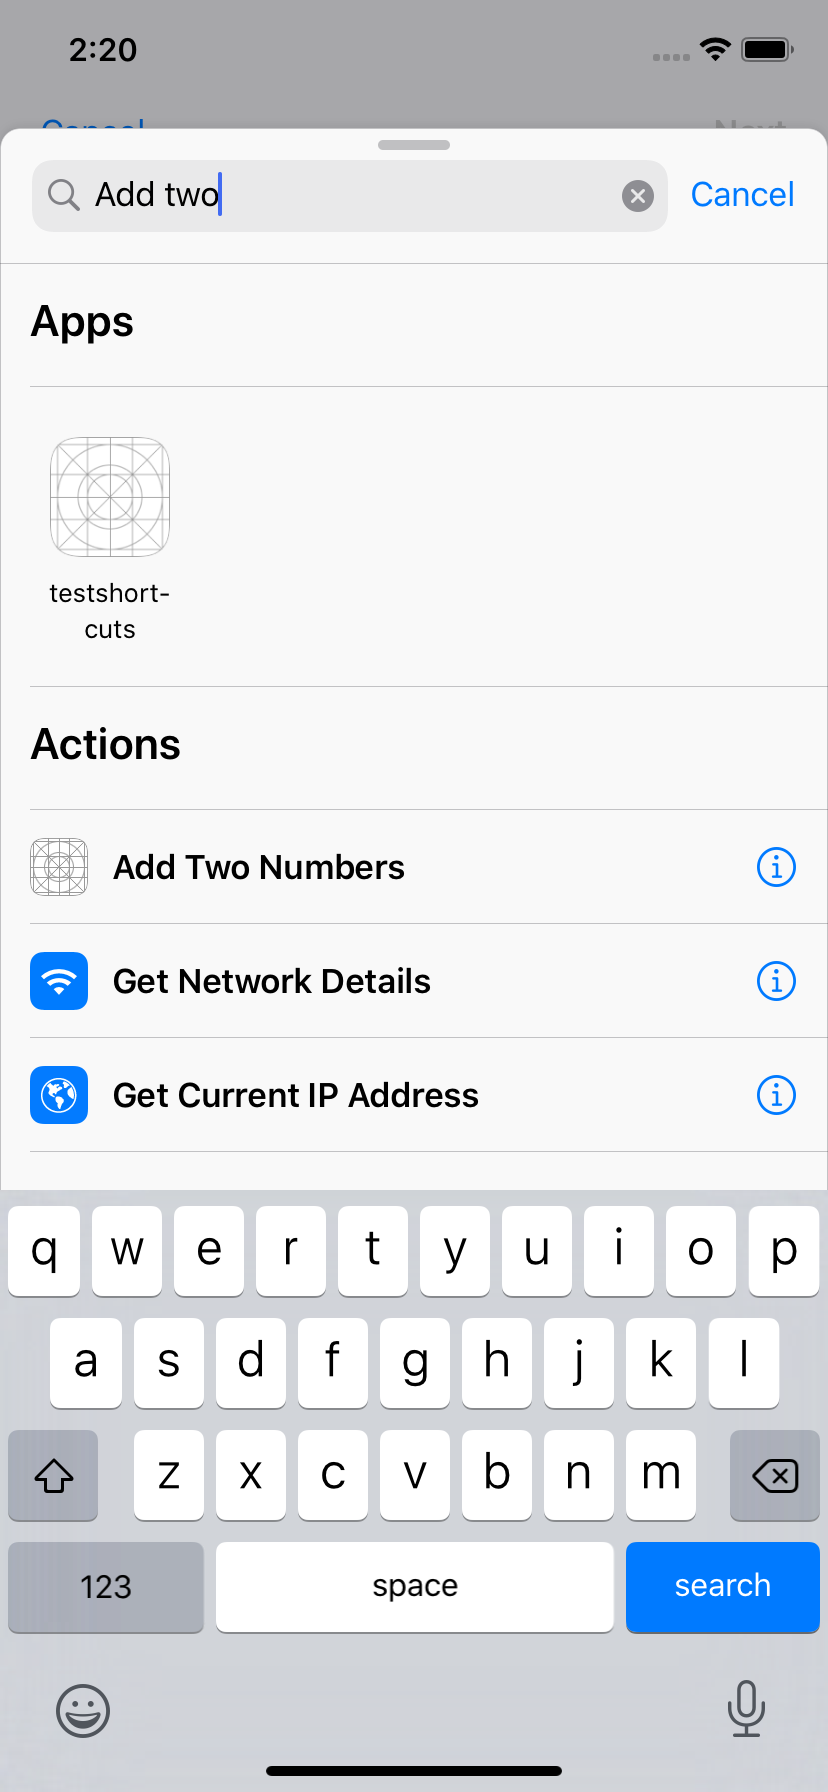
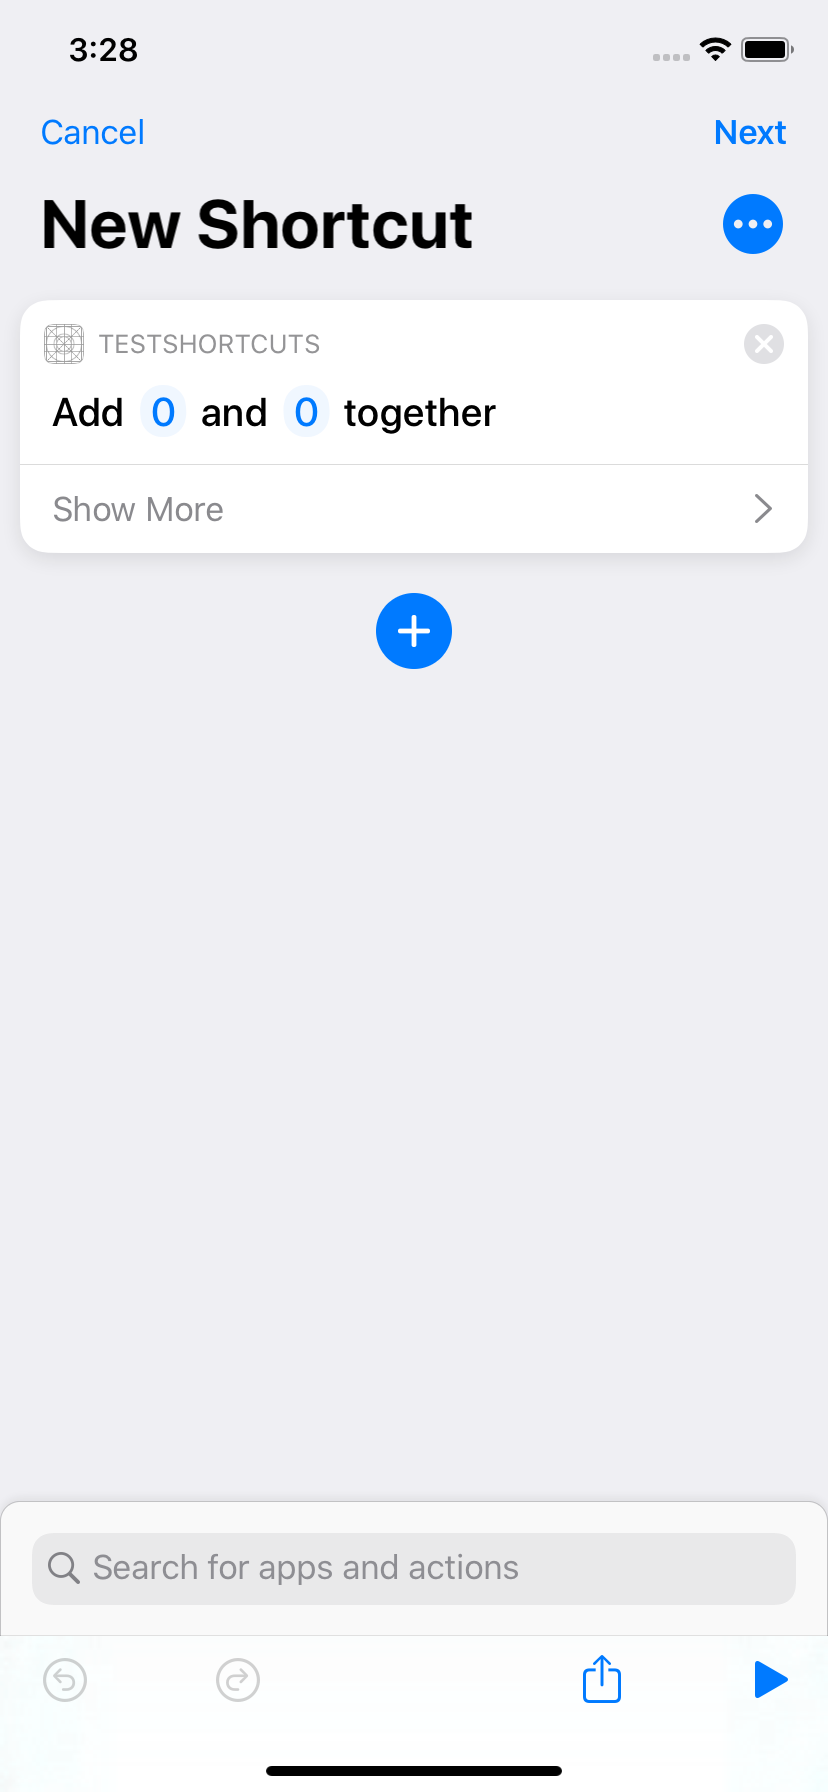
If you run the app, it will automatically add your Intents to the Shortcuts app. Open the app, create a new Shortcut, and search for your Add Two Numbers action. When you add the action, it will look like this:
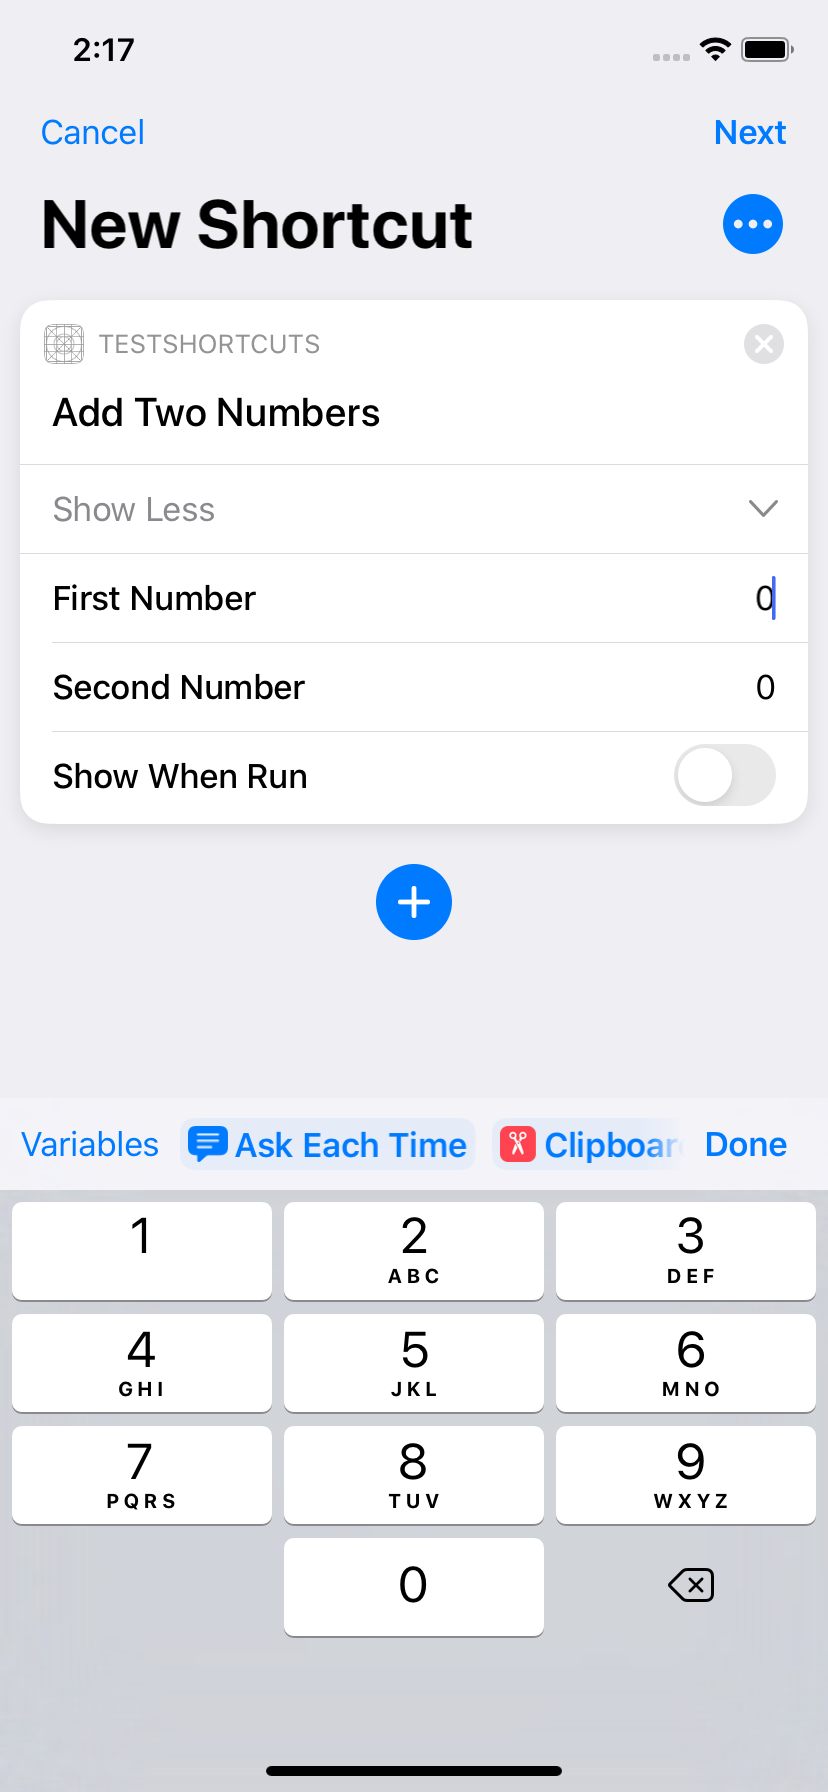
But we can make it look a little bit prettier and more user friendly.
Shortcuts app Configurations
Parameters and Inputs
The Input Parameter allows you to define what variable will receive the value outputted from the previous action. There’s no way to define more receiving variables at this time, but users can configure variables in the action and pass in more data that way.
The Key Parameter will let Siri Suggestions suggest values for the chosen variable.
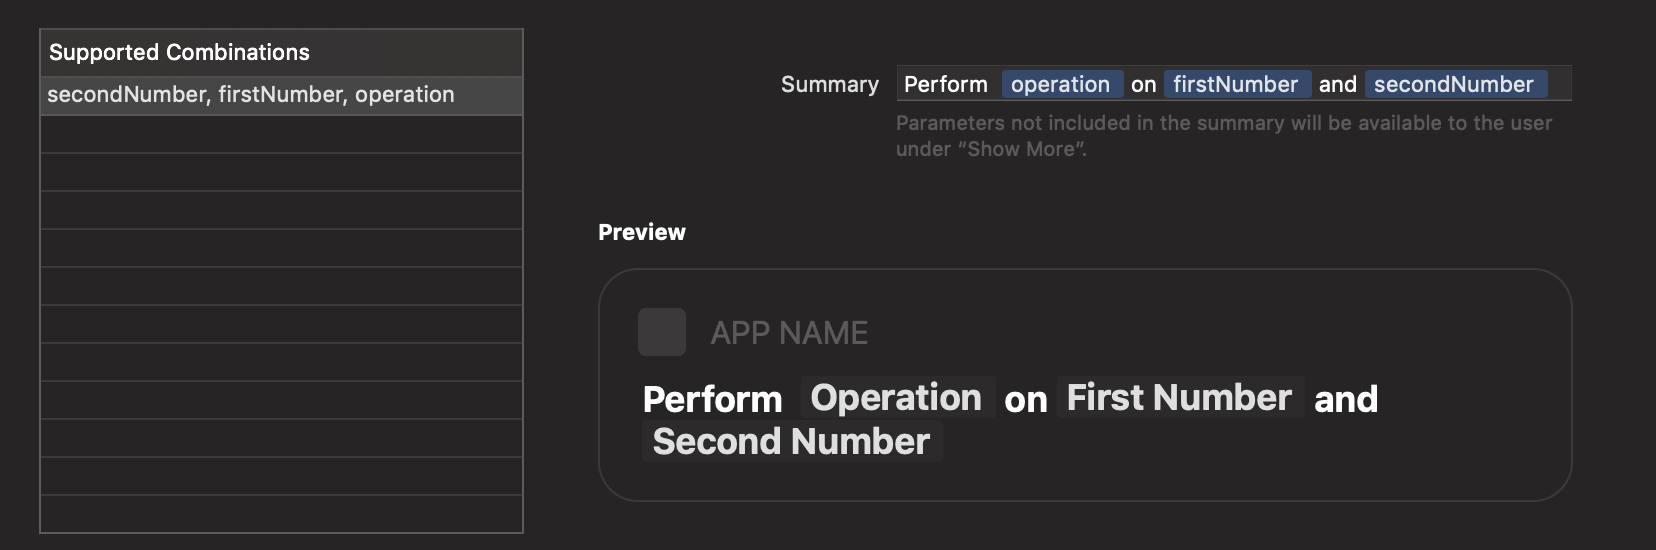
The next section is more interested, as it allows you to define different variable combinations. You can define what kind of combinations should work, so the user has a sense of optional values to configure the action further. Along with the combinations, you can pass in a summary. This summary a user-facing string, and you can customize it as such. You can display variables in this screen, and the UI will show a string with place holders to the user.
If you add the string “Add firstNumber and secondNumber together”, while you write your string, you will get suggestions to add the variables as placeholders. At the end, it will look like this:
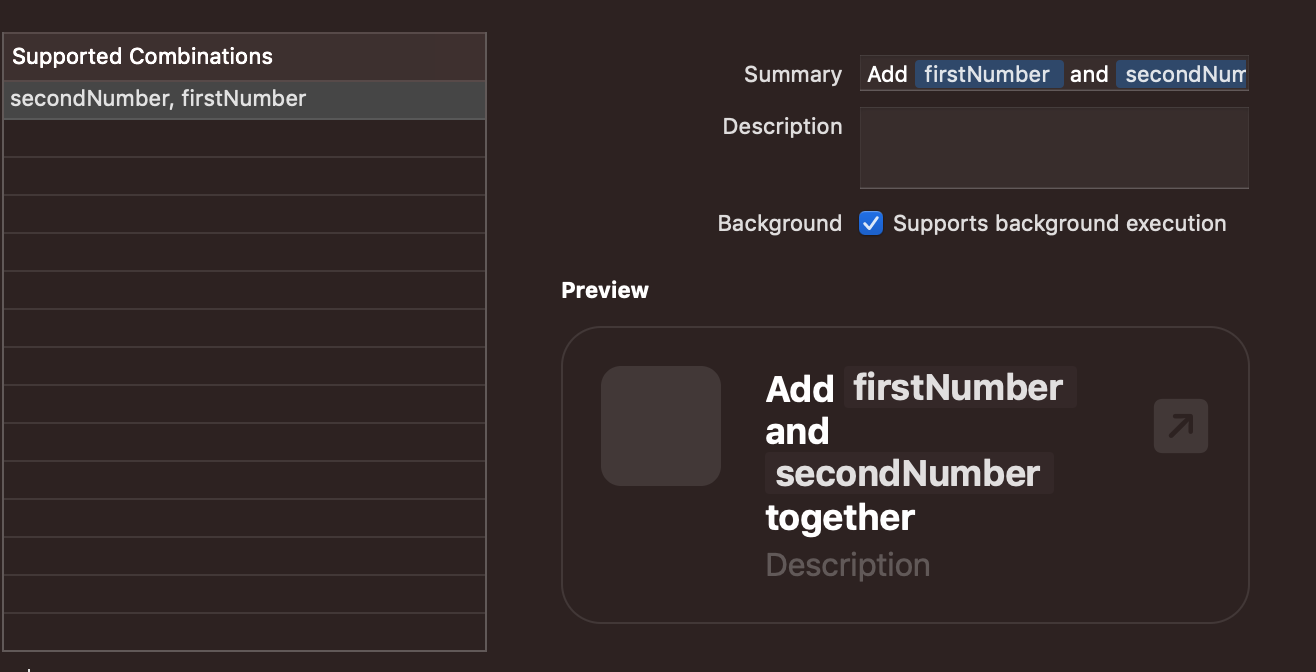
Building and running the app will update the Shortcut Action to look like this:
In order to actually configure different Supported Combinations, you need to make parameters dependent of others with the Parent Parameter configuration. In our case we need two numbers to add together, so we won’t be using different combinations.
Outputs and Results
Before we can write code, we have to finish up the Shortcut Intent Configuration. We have configured the Inputs, so let’s deal with the Outputs now.
Below the AddNumbers intent, there’s a “Response”. Here you can configure the outputs for your Shortcut. Copy this simple Response output:

You can define multiple properties that your Action can output. Give it a Display Name for your user to see, a Type (in our case, an Integer, since we are adding Integers), and whether it’s an array of multiple values. On Output choose Addition, and this way our Shortcut can now be chained to other actions from other apps, including system ones.
Implementing Shortcut Action Logic
Now is a good time to add logic to our new action. The idea is to illustrate how parametrized actions work before we talk about more advanced configuration options.
Open the IntentHandler.swift file. You will notice that Apple provides a lot of code for handling message intents as an example. We don’t really need all that, so let’s simplify the entire content of this class. You can replace the whole file with this:
class IntentHandler: INExtension {

    override func handler(for intent: INIntent) -> Any {
        return self
    }
}
The way I write my handlers is by letting the default IntentHandler class launch my own handlers. Like the name implies, this class handles Shortcuts for you.
Create a new file called AddNumbersIntentHandler.swift in your Intents target. I implemented mine as so:
class AddNumbersIntentHandler: NSObject, AddNumbersIntentHandling {
  func handle(intent: AddNumbersIntent, completion: @escaping (AddNumbersIntentResponse) -> Void) {
    let firstNumber = intent.firstNumber!
    let secondNumber = intent.secondNumber!
    let result = NSNumber(value: firstNumber.intValue + secondNumber.intValue)
    let response = AddNumbersIntentResponse.success(addition: result)
    completion(response)
  }

  func resolveSecondNumber(for intent: AddNumbersIntent, with completion: @escaping (AddNumbersSecondNumberResolutionResult) -> Void) {
    var result: AddNumbersSecondNumberResolutionResult = .unsupported()

    defer { completion(result) }

    if let number = intent.secondNumber?.intValue {
      result = AddNumbersSecondNumberResolutionResult.success(with: number)
    }
  }

  func resolveFirstNumber(for intent: AddNumbersIntent, with completion: @escaping (AddNumbersFirstNumberResolutionResult) -> Void) {

    var result: AddNumbersFirstNumberResolutionResult = .unsupported()

    defer { completion(result) }

    if let number = intent.secondNumber?.intValue {
      result = AddNumbersFirstNumberResolutionResult.success(with: number)
    }

  }
}
An explanation of what’s going on here is in order.
SiriKit will automatically create some classes and protocols for you, including a -Handling protocol file, based on the contents of your intent definition file. My intent is called AddNumbers, so Xcode generated AddNumbersIntentHandling for me, and I’m implementing its methods. Also, our class is inheriting from NSObject because the -Handling protocol created for us requires it. You could implement the requirements yourself, but you can save yourself the trouble by simply inheriting from NSObject.
This protocol requires you implement a few methods. The handle method exists in all -Handling protocols. The other required methods depend on the parameters you define as part of your intent, and they are all about resolving the Parameters. Here, both methods are implemented in the same way and they both check that we do have some integer value in firstNumber and secondNumber. If we don’t, we pass in a value to the system. Xcode also generates -Result objects for us, and that’s what we use to let the system know about the status of our variables. In general, you can resolve to anything. In our case, we are just resolving to the numbers themselves because that’s what we want. You can resolve to different values depending on the needs of your action.
The handle function will actually perform our operation: In our case, it will add firstNumber and secondNumber together and return the result back to the system. In the intentdefinition file, we defined that a variable called addition will contain the output of our action - the sum of both numbers, so to pass this result back to the system, we create a new -Response object - also generated by Xcode -, specify it was a success, and pass it the output variable as part of that method call.
Go back to IntentHandler.swift and replace the body of the handle(for:) method with the following:
let addNumbersIntentHandler = AddNumbersIntentHandler()
return addNumbersIntentHandler
Like we said earlier, you can use this method to return different handlers for different intents. We will do that a little bit later, towards the end of this article.
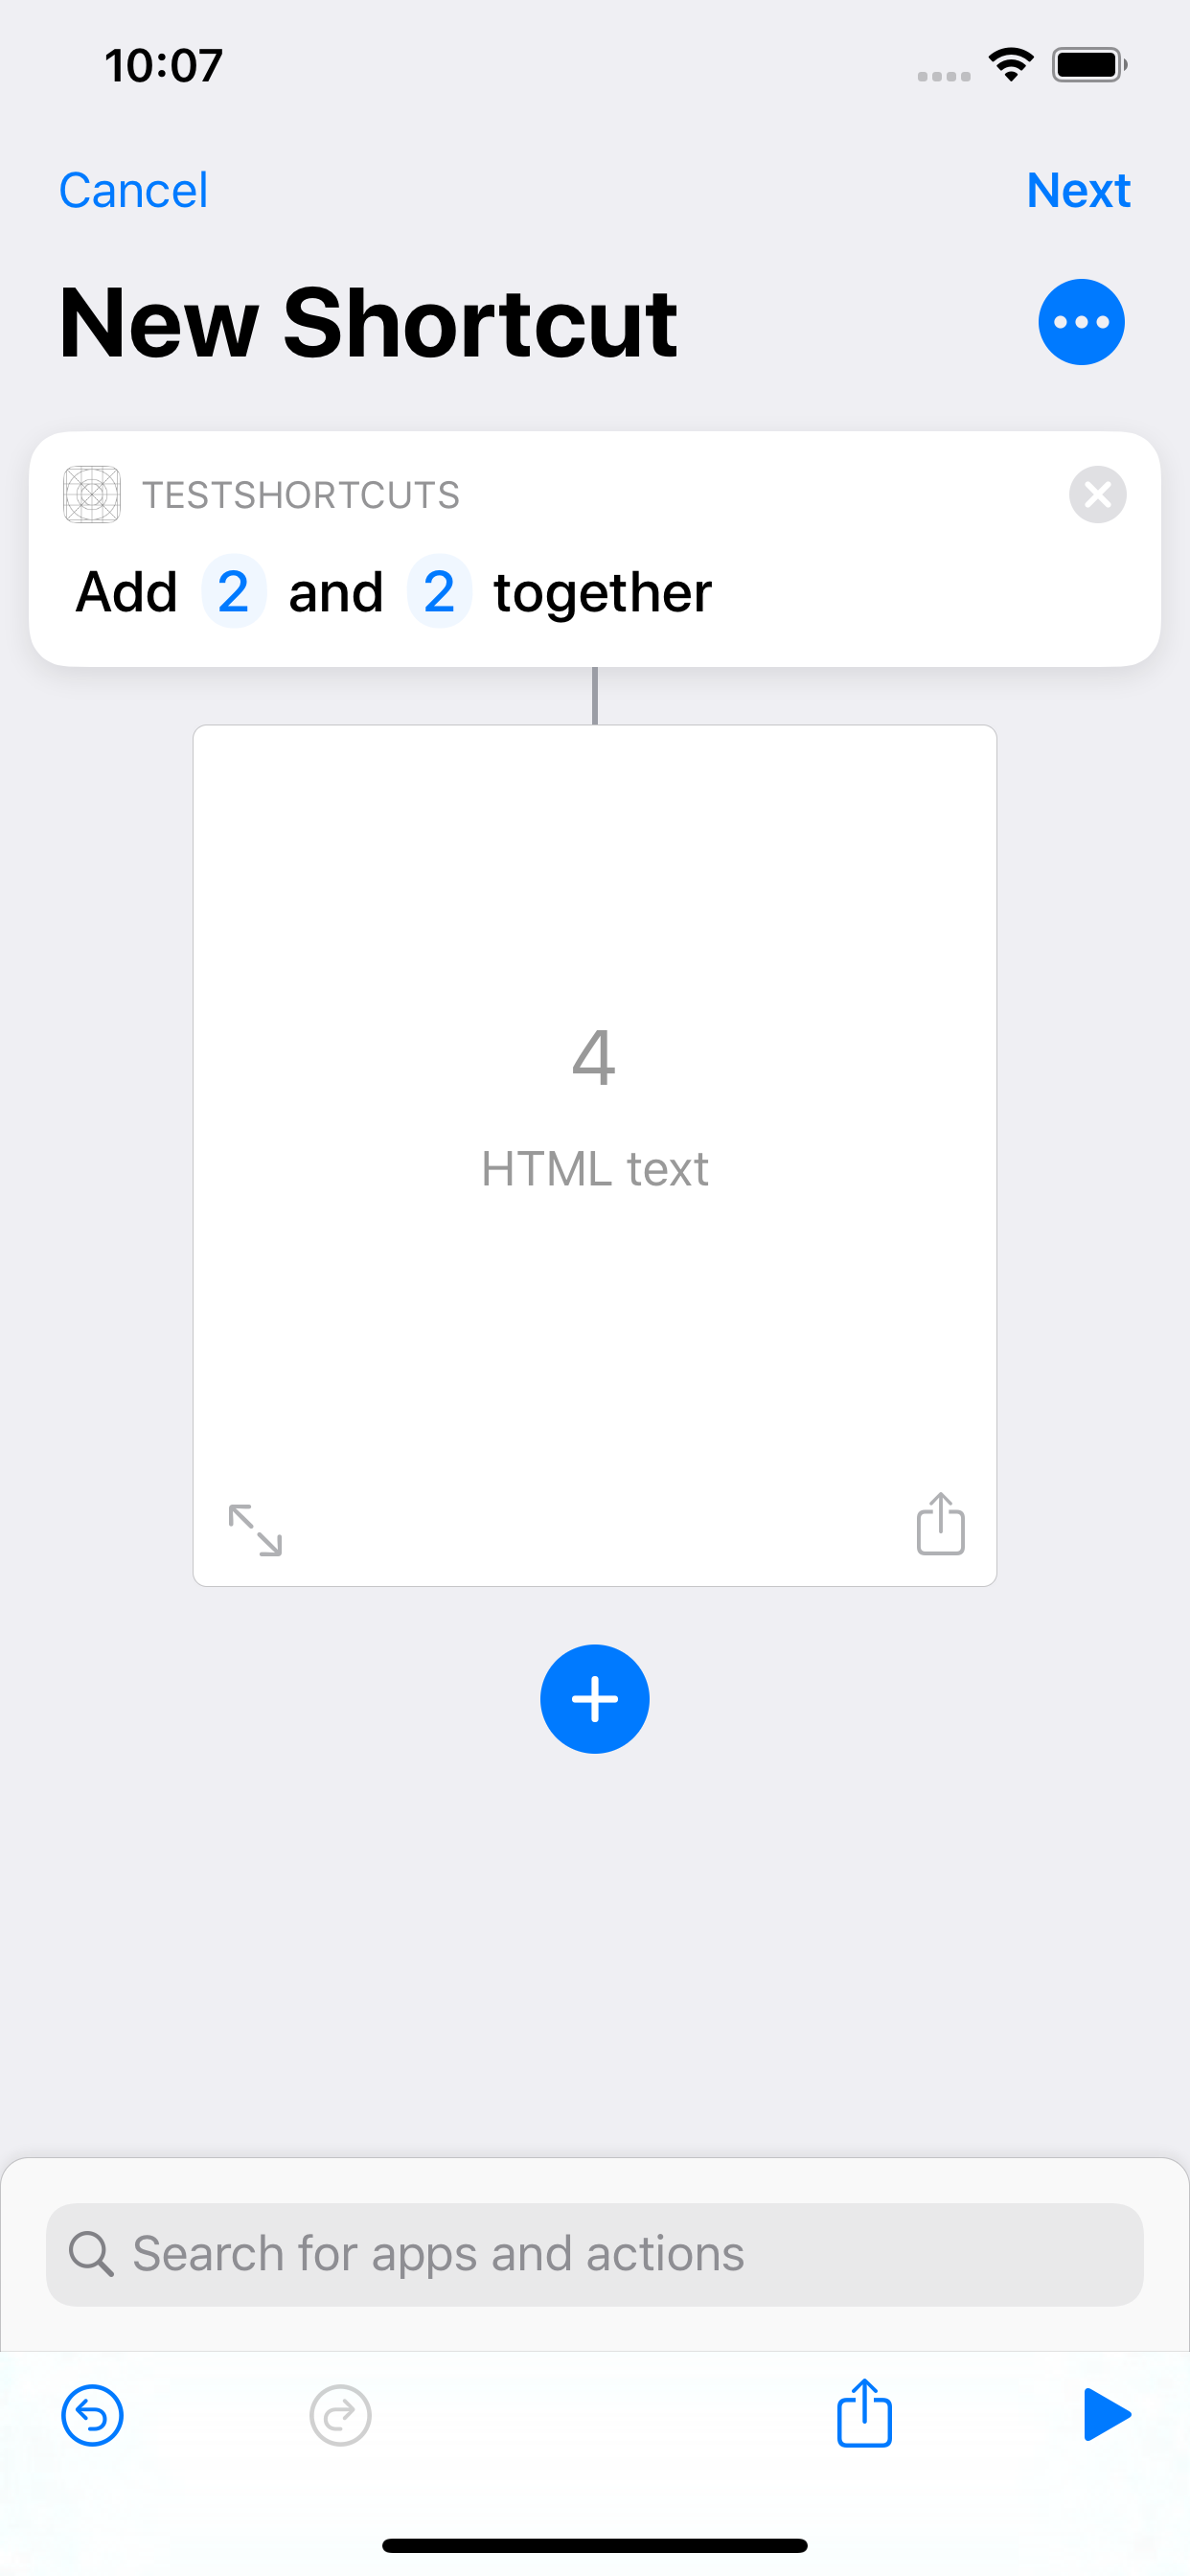
Run your Extension now, and create a shortcut that uses your “Add Two Numbers” action. Give it two numbers, and you will see that it works… Sort of. Shortcuts is trying to display some UI to the user, but it ends up doing nothing and displaying nothing at all. When you dismiss this UI, Shortcuts will continue executing your action and show you the final result in the native UI.
This weird UI is part of the Intents UI framework that was added to your project automatically when you added the Siri capability. Exploring this framework is out of the scope of this article, and we don’t even need it. The easiest way to remove it, is to go to the Info.plist file of the Intents UI target, expand NSExtension, expand NSExtensionAttributes, expand IntentsSupported, and finally delete the entry that has your custom intent type there. Once you do that, when you build and run your action again, Shortcuts will no longer try to open the Intents UI.
And that’s great. You have now created a new action that can take input, produce and output, and that it can work inside a chain of other actions from other apps is it can receive data from anyone, and produce an output that can be received by anyone.
Using Enums to Make Richer Parametrizable Actions
What we did so far allows us to create very interesting actions for our apps. But we can add more features to make them friendlier for our users.
Suppose you want to add a new action to subtract two numbers. Your first thought may be to just duplicate the “AddNumbers” Intent, rename it to “SubtractNumbers”, and implement a new copy-paste version of AddNumbers to add the subtraction method.
We can avoid all that code duplication by implementing an enum. An enum you know and love from writing Swift. You can then let the user choose an enum as part of the action’s parameters. In this case, we will implement an enum called Operation which will have addition and subtraction.
Start by once again going to your intentdefinition file, click the “+” button the same way you created your first intent, and select “New Enum”. Name it “Operation”.
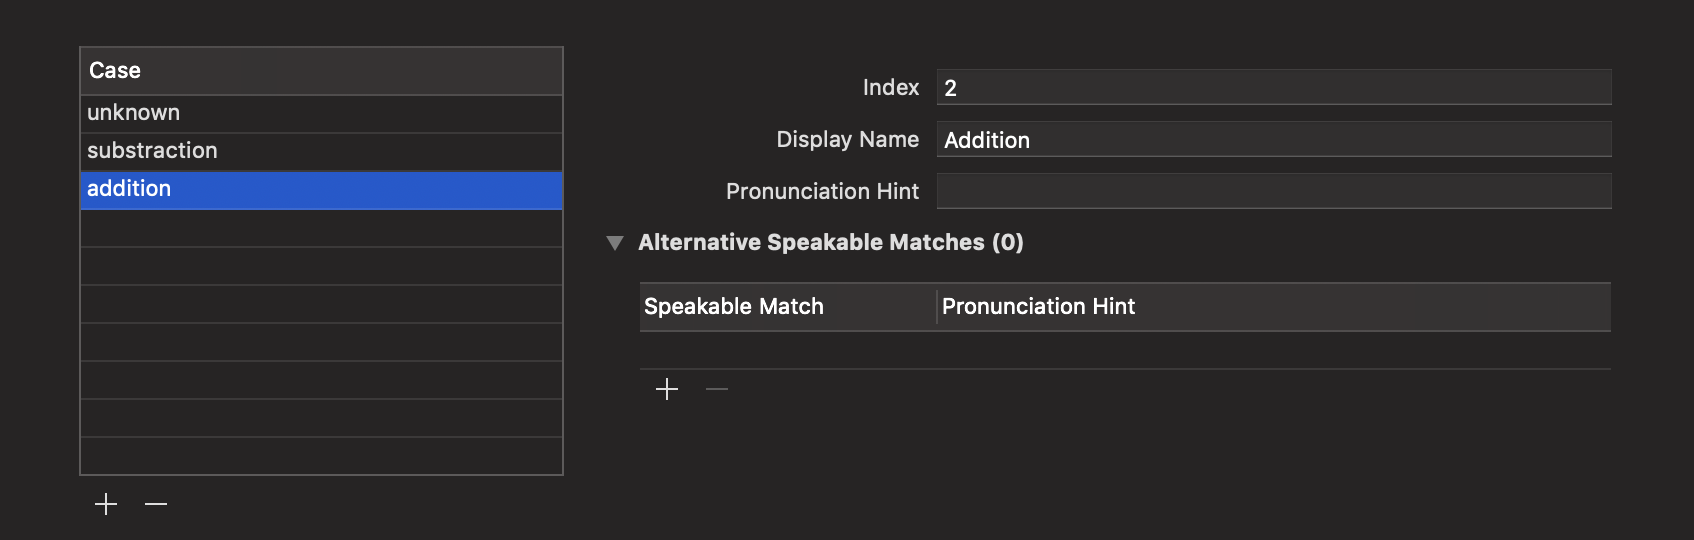
You can now add simple enum values that represent an addition and subtraction. It’s not possible to remove the “unknown” case. Changing the “Display Name” will change the string shown to the user. The other options are more specific to Siri, so we will not be changing those at this time.
Adding addition and subtraction options will make the configuration look like this:
We will replace “AddNumbers” with “OperateNumbers”, so rename the intent accordingly. Feel free to change the title and description while you are at it.
Next, we need to add a new parameter that represents the operation we want to do. Add a new parameter and change it’s type to Operation, which is the operation we defined just now. Choose the default type to something other than unknown.
Also change the “Shortcuts app” section to take into account the new parameter:
If you try to build the project again, you will get a handful of errors. All of them are related to missing symbols. Remember how we mentioned that Xcode automatically generates a lot of protocols and classes based on your intentdefinition file? We have essentially deleted all the previous symbols the moment we chose to rename “AddNumbers” to “OperateNumbers”.
To solve this, you could rename all the “AddNumbers-” code to “OperateNumbers-”. Feel free to do that. I will create a new class and move the content over before deleting the original AddNumbersIntentHandler.swift file.
I implemented OperateNumbersIntentHandler.swift as such:
class OperateNumbersIntentHandler: NSObject, OperateNumbersIntentHandling {
  func operate(with operation: Operation, firstNumber: Int, secondNumber: Int) -> Int {
    switch operation {
    case .addition: return firstNumber + secondNumber
    case .subtraction: return firstNumber - secondNumber
    default: fatalError("Invalid operation")
    }
  }

  func handle(intent: OperateNumbersIntent, completion: @escaping (OperateNumbersIntentResponse) -> Void) {

    let opResult = operate(with: intent.operation,
                           firstNumber: intent.firstNumber!.intValue,
                           secondNumber: intent.secondNumber!.intValue)

    let result = OperateNumbersIntentResponse.success(addition: NSNumber(value: opResult))

    completion(result)

  }

  func resolveSecondNumber(for intent: OperateNumbersIntent, with completion: @escaping (OperateNumbersSecondNumberResolutionResult) -> Void) {
    var result: OperateNumbersSecondNumberResolutionResult = .unsupported()

    defer { completion(result) }

    if let number = intent.secondNumber?.intValue {
      result = OperateNumbersSecondNumberResolutionResult.success(with: number)
    }
  }

  func resolveFirstNumber(for intent: OperateNumbersIntent, with completion: @escaping (OperateNumbersFirstNumberResolutionResult) -> Void) {
    var result: OperateNumbersFirstNumberResolutionResult = .unsupported()

    defer { completion(result) }

    if let number = intent.firstNumber?.intValue {
      result = OperateNumbersFirstNumberResolutionResult.success(with: number)
    }
  }

  func resolveOperation(for intent: OperateNumbersIntent, with completion: @escaping (OperationResolutionResult) -> Void) {
    var result: OperationResolutionResult = .unsupported()

    defer { completion(result) }

    let operation = intent.operation
    if operation != .unknown {
      result = .success(with: operation)
    }
  }
}
Everything is essentially the same. The resolveOperation method will check to see that we have a valid operation, and if we don’t, we tell the system that it’s an unsupported parameter. We also added a new function that will do math based on the operation parameter.
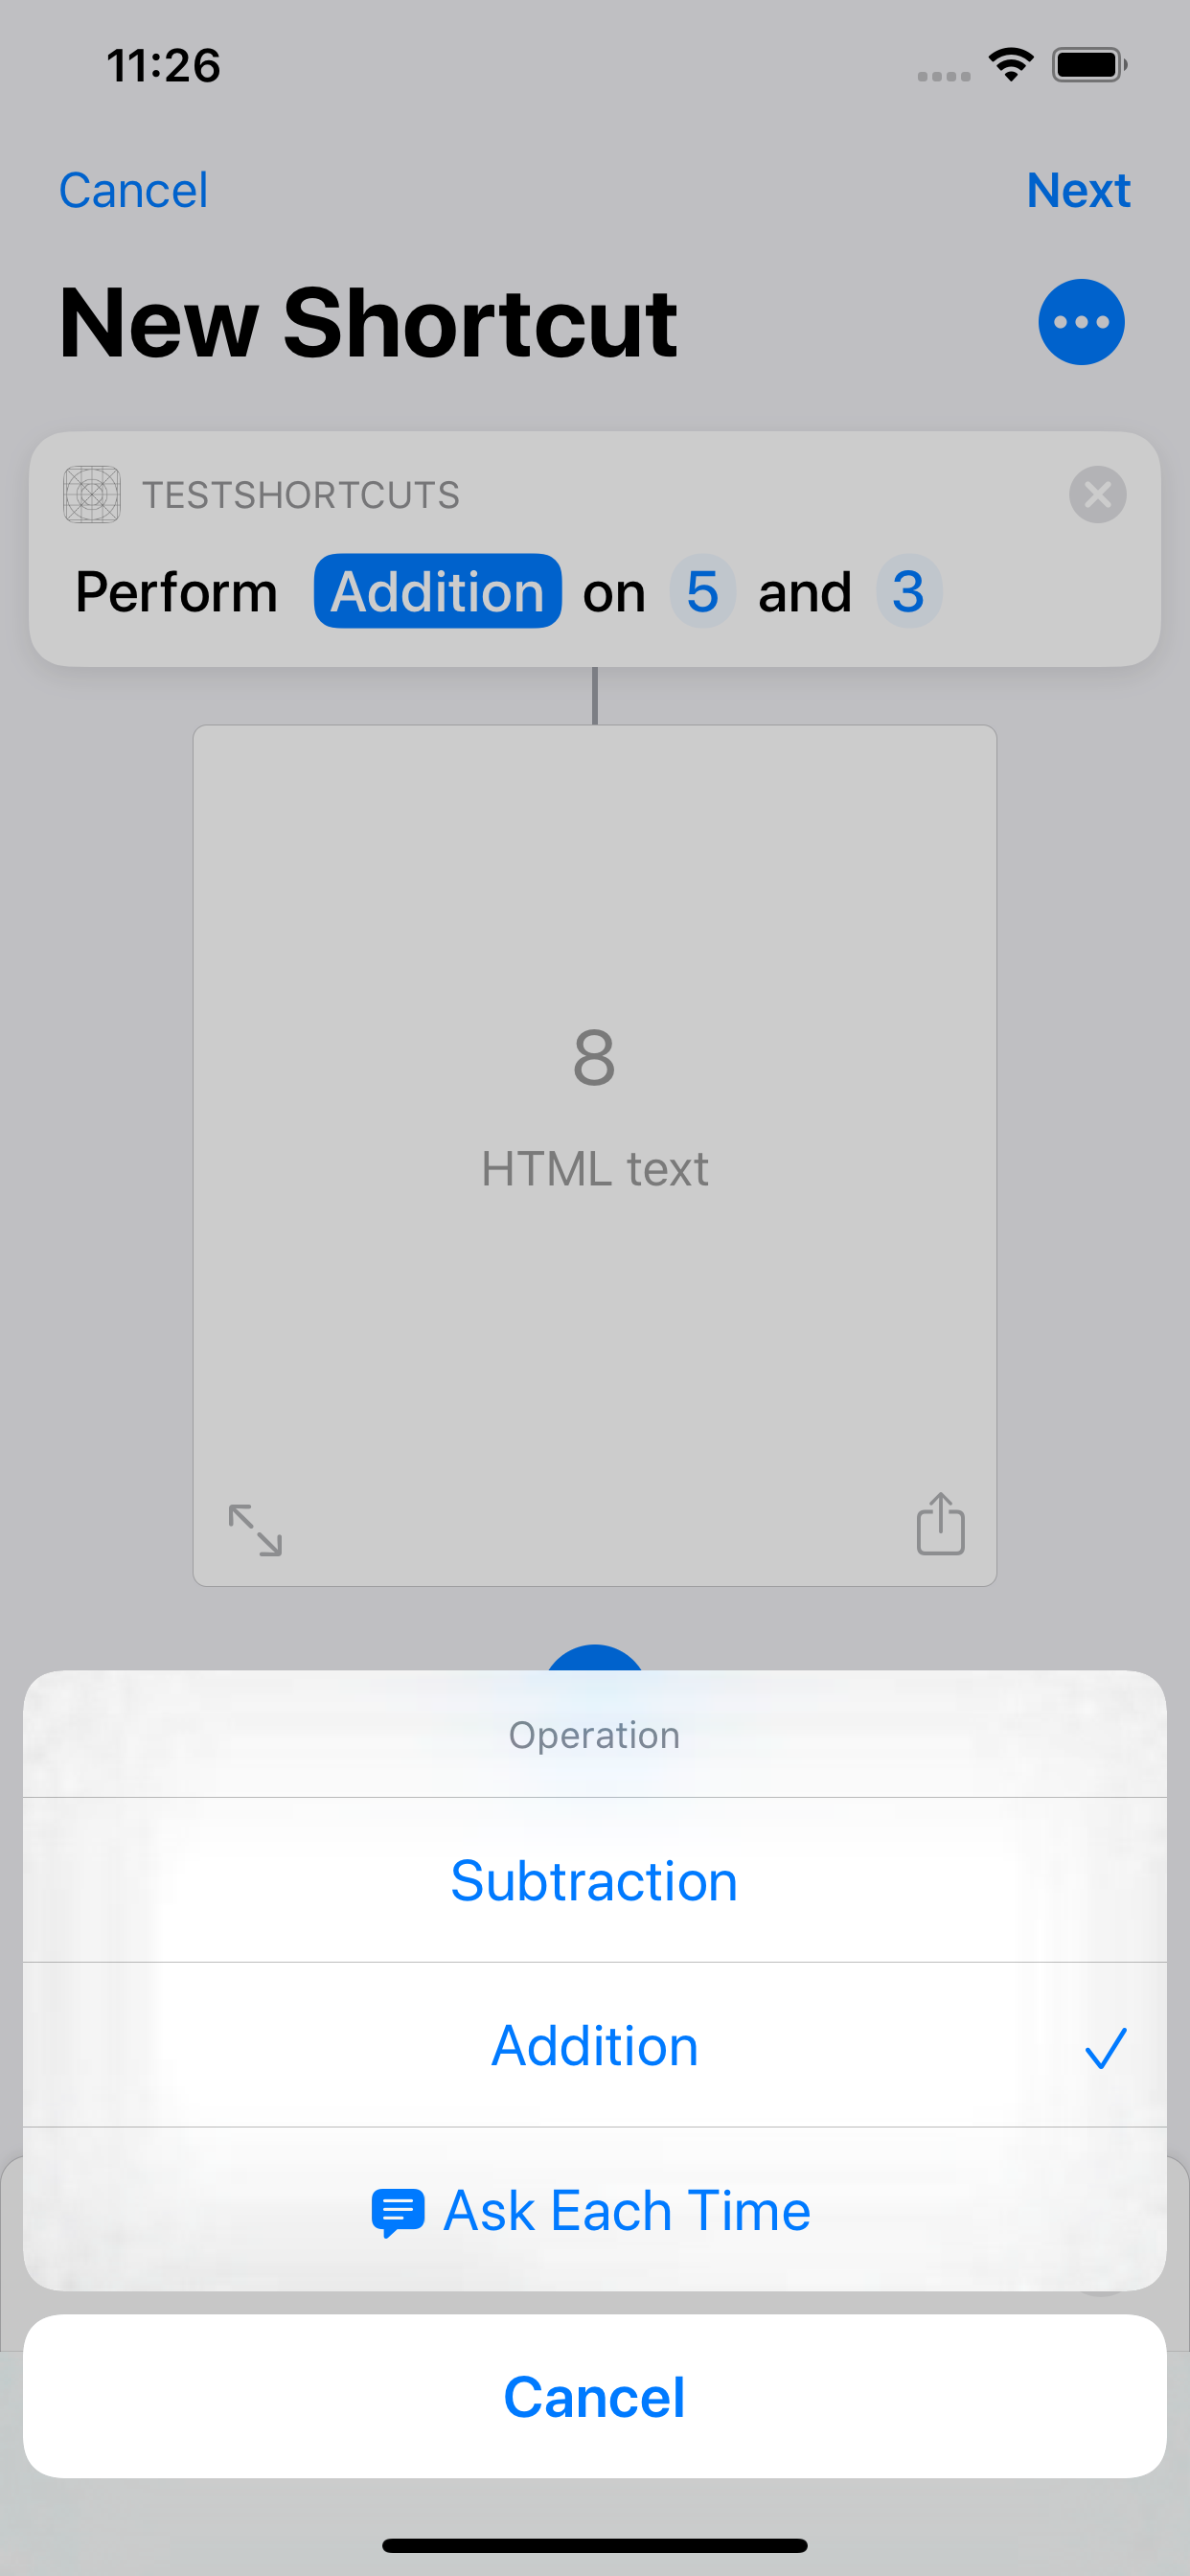
Run the action again, and this time you have a way to choose an operation. Tapping on the operation will prompt you between Addition and Subtraction.
Project Download
If you don’t feel like following the steps above, you can download the completed project here and explore it at your own pace.
Conclusion
The Shortcuts app has received a very nice improvement with the introduction of Parameters on iOS 13. In this article we explored how you could implement them in your own apps, by creating a simple Action that allows users to pass in numbers to do some math operation on them. We saw how actions are exactly like functions - black boxes that take input and produce and output - and how developers can leverage them for their users.