
Working with REST APIs you have no control over can be a little monotonous. This is especially for OAuth 2.0 API that need you to do a little bit of setup, get your API keys with the service provider, and then you need to do the setup on your app’s size: Configure your URL scheme, deal with that URL Scheme, and write code that does something when your app gets called with that URL.
In the old days of iOS development, this took quite a while. If you adopted something like the Facebook and Twitter APIs, you likely used their SDKs as they dealt with all these issues for you. If you wanted to use a service that didn’t provide an SDK, you were of luck, and had to do quite a little bit of setup.
Luckily for us, starting on iOS 12, Apple introduced the AuthenticationServices, which, amongst many many things, it greatly simplifies the OAuth 2.0 flow for REST APIs, thanks to the ASWebAuthenticationSession object.
Initial Setup
I recently had to use the Anilist API for an upcoming up, so a lot of the sample code will come from this project.
Regardless of the service you are interacting with, you will first need to get your API credentials.
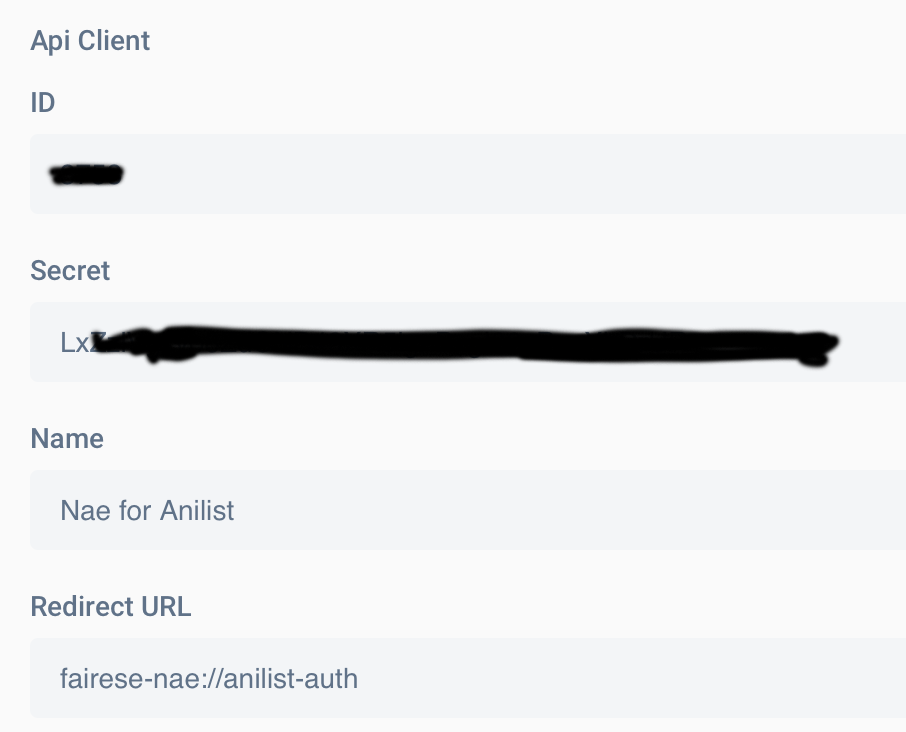
At the very least, they will always give you an API secret.
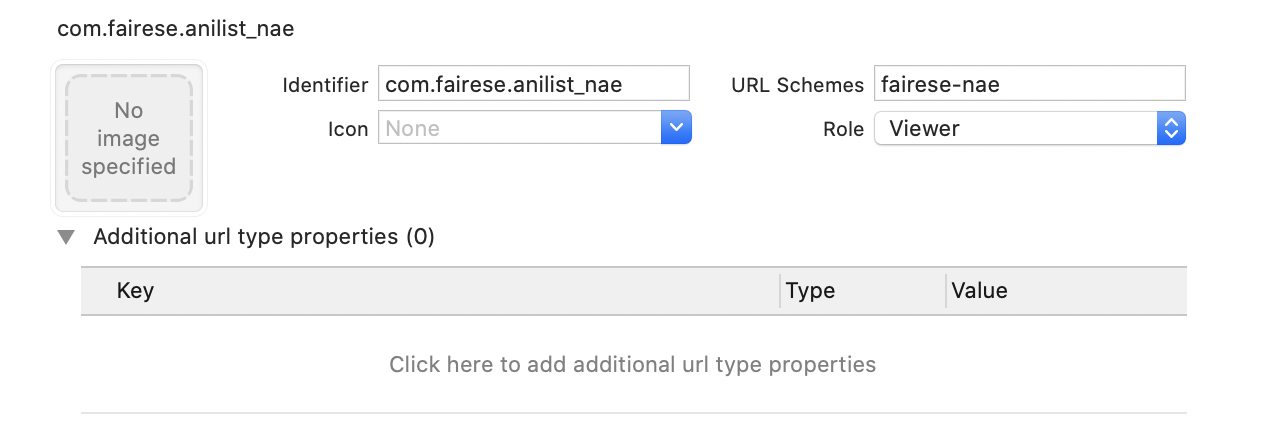
You still need to configure your URL Scheme to call your app. To do this, click your project blueprint in Xcode, click Info, select your Target, and expand the URL Types section. The identifier needs to be anything in reverse DNS donation. The scheme has to be everything up to but not including :// of your URL. Depending on the service provider, you may have the flexibility of creating your own or they will assign one to you. Set the role to Viewer, thought it doesn’t really matter for iOS apps.
And that’s all we need to do for the initial setup. We can now start writing some code.
The View and ViewModel
Because we are using SwiftUI, we can create our views and a companion ViewModel object.
The ViewModel
The ASWebAuthenticationPresentationContextProviding Protocol
The ViewModel will take care of handling the actual authentication flow for us. It must conform to the ASWebAuthenticationPresentationContextProviding protocol.
class SignInViewModel: NSObject, ObservableObject, ASWebAuthenticationPresentationContextProviding {
}
Also note the NSObject inheritance. This is necessary, because we are conforming to ASWebAuthenticationPresentationContextProviding. If you don’t inherit from NSObject you will need to do a lot of implementations to satisfy the constraint, and it’s not easy or short to do.
Before we move on, let’s satisfy that ASWebAuthenticationPresentationContextProviding protocol. There’s only one tiny method we need to implement.
class SignInViewModel: NSObject, ObservableObject, ASWebAuthenticationPresentationContextProviding {

    // MARK: - ASWebAuthenticationPresentationContextProviding

    func presentationAnchor(for session: ASWebAuthenticationSession) -> ASPresentationAnchor {
        return ASPresentationAnchor()
    }

}
This method is actually one of the source of confusion developers have when they try to integrate this framework with web logins. I have seen implementations where people try to get a reference to UIWindow and all other kinds of hacky jobs to get this to work, but nothing like that is necessary. In SwiftUI 2, it’s not easy (is it even possible?) To get a reference to the main window and use that as the presentation anchor, so it’s good to know you don’t need to keep any kind of whacky references to get this to work.
Everything this method is doing is telling the framework “hey, use use a presentation anchor appropriate for this platform”. You don’t need to give it any other context information or references. In fact, the ASPresentationAnchor documentation states:
A platform-specific type that indicates the kind of user interface element to use as a presentation anchor.
The system will choose the right anchor for you, so you don’t have to worry about grabbing one up from up above the view hierarchy.
Furthermore, the documentation even tells you how it is implemented:
For iOS, Mac Catalyst, tvOS:
typealias ASPresentationAnchor = UIWindow
for macOS:
typealias ASPresentationAnchor = NSWindow
So no need to grab references or anything. Just return ASPresentationAnchor and let the framework do the rest.
The SignIn Method
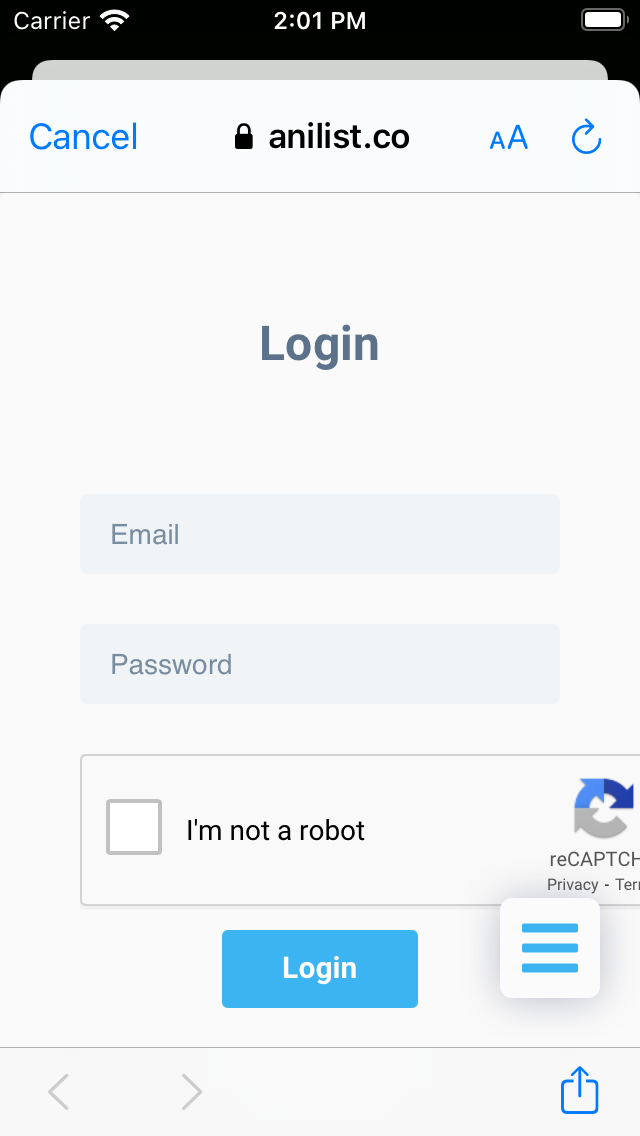
We can finally write the actual code that will show up the login UI. The login UI is a website provided by the OAuth 2.0 service, where the user logs in without having to enter their credentials directly into their app. Once the user finishes the login flow with the service, the service calls your custom URL Scheme with a longer URL that contains an access token.
    func signIn() {
        let signInPromise = Future<URL, Error> { completion in
            let apiData = AnilistAPIConfigurations.load()
            let authUrl = AnilistAuthenticationURLBuilder(clientID: apiData.id)()

            let authSession = ASWebAuthenticationSession(
                url: authUrl, callbackURLScheme:
                    apiData.redirectURL.absoluteString) { (url, error) in
                if let error = error {
                    completion(.failure(error))
                } else if let url = url {
                    completion(.success(url))
                }
            }

            authSession.presentationContextProvider = self
            authSession.prefersEphemeralWebBrowserSession = true
            authSession.start()
        }

        signInPromise.sink { (completion) in
            switch completion {
            case .failure(let error): // Handle the error here. An error can even be when the user cancels authentication.
            default: break
            }
        } receiveValue: { (url) in
            self.processResponseURL(url: url)
        }
        .store(in: &subscriptions)
    }
This looks like a lot, so let’s look at it step by step.
First, I’m getting into the habit of reducing the amount of callback code I have. For this reason, when I find a native API that requires a callback, I wrap it in a combine Future. For more info, check out my Wrapping Asynchronous APIs into Combine Futures article. You do not need to do this, and you can use the callback and its results directly.
Second, we have a AnilistAPIConfiguration object that calls a static load() object.
I bundle an API config file in my app that is simple a JSON file with my API credentials. For those raising eyebrows at this, you are allowed to do this as long as your service provider allows you to use implicit grants.
The JSON file looks like this:
{
    "id": 1,
    "secret": "api_secret",
    "name": "Nae for Anilist",
    "redirectURL": "fairese-nae://anilist-auth"
}
All the values here were given to my by service provider (Anilist). You may need to adapt this or provide your credentials in an entire different way depending on your API provider.
The AnilistAPIConfigurations class is implemented like this:
public class AnilistAPIConfigurations: Codable {
    public let id: Int
    public let secret: String
    public let name: String
    public let redirectURL: URL

    static func load() -> AnilistAPIConfigurations {
        let filePath = Bundle.main.url(forResource: "anilist_api", withExtension: "json")!
        let data = try! Data(contentsOf: filePath)
        let object = try! JSONDecoder().decode(AnilistAPIConfigurations.self, from: data)
        return object
    }
}
The load() does not safely unwrap, because I want it to fail when it’s not possible to use my credentials.
The AnilistAuthenticationURLBuilder builds the authentication URL for the service. You could hardcore your URL here directly, or anything else. Just know you need an authentication URL the service will call based on your API secret and other info. The implementation of this object is the following:
/// Builds authentication URLs.
public class AnilistAuthenticationURLBuilder {

    /// The domain URL
    let domain: String

    /// Client ID
    let clientID: Int

    init(
        domain: String = "anilist.co",
        clientID: Int) {
        self.domain = domain
        self.clientID = clientID
    }

    var url: URL {
        var components = URLComponents()
        components.scheme = "https"
        components.host = domain
        components.path = "/api/v2/oauth/authorize"
        components.queryItems =
            [
                "client_id": String(clientID),
                "response_type": "token"
            ].map { URLQueryItem(name: $0, value: $1) }
        return components.url!
    }

    func callAsFunction() -> URL {
        url
    }
}
Anilist requires you build the URL with the client ID. The secret is not necessary for this specific API (and grant type).
Next, we have the core of this article - the ASWebAuthenticationSession object.
To create this object, you need to give it:
- The Authentication URL (
authUrl). This is the URL that the web view will display once it loads. It will show the service’s login page in which your users write their credentials and finish the login flow. - The callback URL Scheme: This is the scheme that was both provided by the service and that we configured in our project’s Target.
- A callback: The callback will give us an error or an URL containing the access token and possibly other login info. When the callback gets called, at the very least we need to grab the access token and store it in our app for authenticated requests.
I have also set two additional properties:
authSession.presentationContextProvider = authSession.prefersEphemeralWebBrowserSession = true
The former is necessary, as that will assign us as the context provider. The later sets the web browser session as ephemeral, meaning that each time we show this web view, it will not try to use any cookies or data from a past authentication session. I do this because if the user logs out of the app, they may want to login into a different account.
Finally, once you call start(), the session will start, the web view will be displayed, and your user will be able to authenticate against the service.
Handling the Response
If the callback gets called successfully with an URL, we need to parse out the access token and store it. I will leave the storage details to you as that will depend on how secure the token must be and your own needs.
To parse out the token, I created the processResponseURL(_) method:
func processResponseURL(url: URL) {
    let anilistComponents = URLComponents(url: url, resolvingAgainstBaseURL: true)
    // Anilist actually returns the token in a messed up way.
    // All the parameters - including query parameters - are AFTER the fragment.
    // So I can't just access the query property of these components to get all the data I need.
    // To work around this and save myself the headache of possible encoding issues, I will create
    // a new URL using the fragment of the old components and some dummy domain.

    if  let anilistFragment = anilistComponents?.fragment,
        let dummyURL = URL(string: "http://dummyurl.com?\(anilistFragment)"),
        let components = URLComponents(url: dummyURL, resolvingAgainstBaseURL: true),
        let queryItems = components.queryItems,
        let token = queryItems.filter ({ $0.name == "access_token" }).first?.value,
        let expirationDate = queryItems.filter ({ $0.name == "expires_in" }).first?.value
        {

        /// Store the token
        /// Store the token expiration date if necessary.
    }
}
This implementation is a bit specific to Anilist. Anilist currently returns the URL query parameters after the fragment, so we cannot grab them with URLComponents’ queryItems property. I had to create a dummy URL, create it with the contents of the response, and grab the token from there. It’s likely that if you use this with another service, you will not need to this as they are likely to return the URL query and fragment (everything after the #) correctly.
For more info on URLComponents, you can read this article.
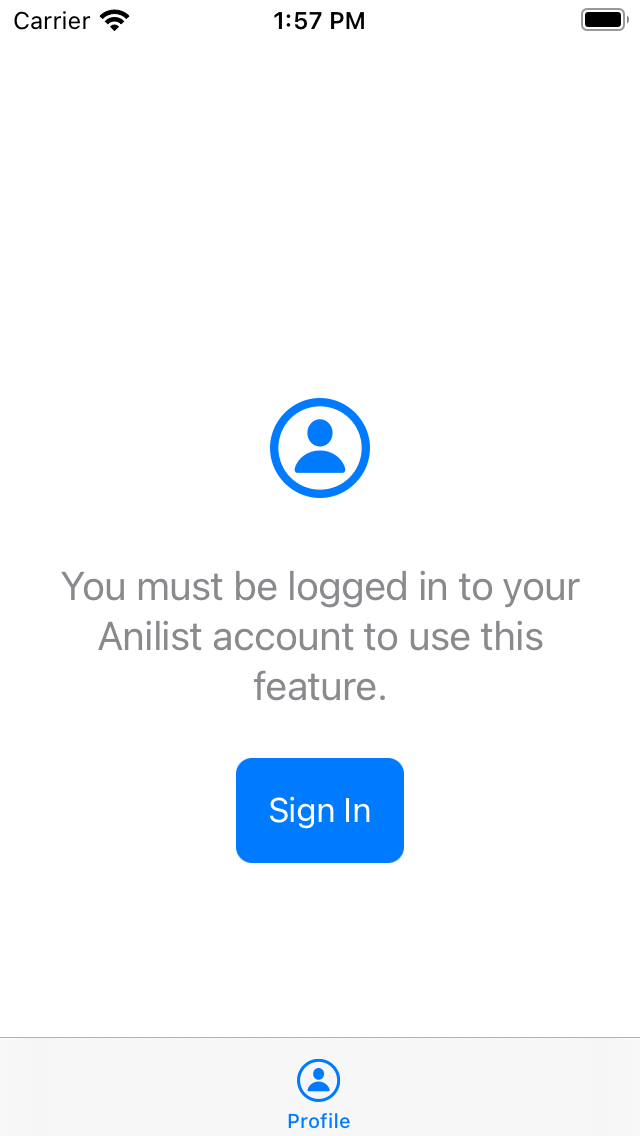
The View
Finally, the view will call our ViewModel’s signIn method, showing the web view. The I used for this is simply this one:
struct SignInView: View {

    @StateObject var viewModel = SignInViewModel()

    var body: some View {
        VStack(spacing: 16) {
            Image(systemName: "person.circle")
                .resizable()
                .frame(width: 50, height: 50)
                .foregroundColor(colorForTheme(color))

            VStack(spacing: 8) {
                Text("You must be logged in to your Anilist account to use this feature")
                    .foregroundColor(.secondary)
                    .font(.title3)
                    .multilineTextAlignment(.center)
                    .padding()
                Button {
                    viewModel.signIn()
                } label: {
                    Text("Sign In")
                        .foregroundColor(.white)
                        .padding()
                        .background(colorForTheme(color))
                        .clipShape(RoundedRectangle(cornerRadius: 8))
                }
            }
        }
    }
}
Tapping the Sign In button will show a web view:
Conclusion
ASWebAuthenticationSession is one of the hidden gems from WWDC18. Authorizing your app with third party web services is now easier than ever, and you can get it done in just a few hours of code, without having to engage in heavy configurations or callbacks.