
UIMenu Improvements in iOS 14
Published on
UIMenu is a new set of APIs that were originally introduced in iOS 13. The API allows us to add menus to different parts of our UIs, including binding actions to key combinations when using your iOS or iPadOS device with a keyboard. Starting on iOS and iPadOS 14 (and ported to macOS Catalyst), this object is more prevalent in the UI thanks to the fact it can be invoqued from different actions.
To understand what I mean, take a look at these screenshots I took from Safari and the Settings app on iOS:
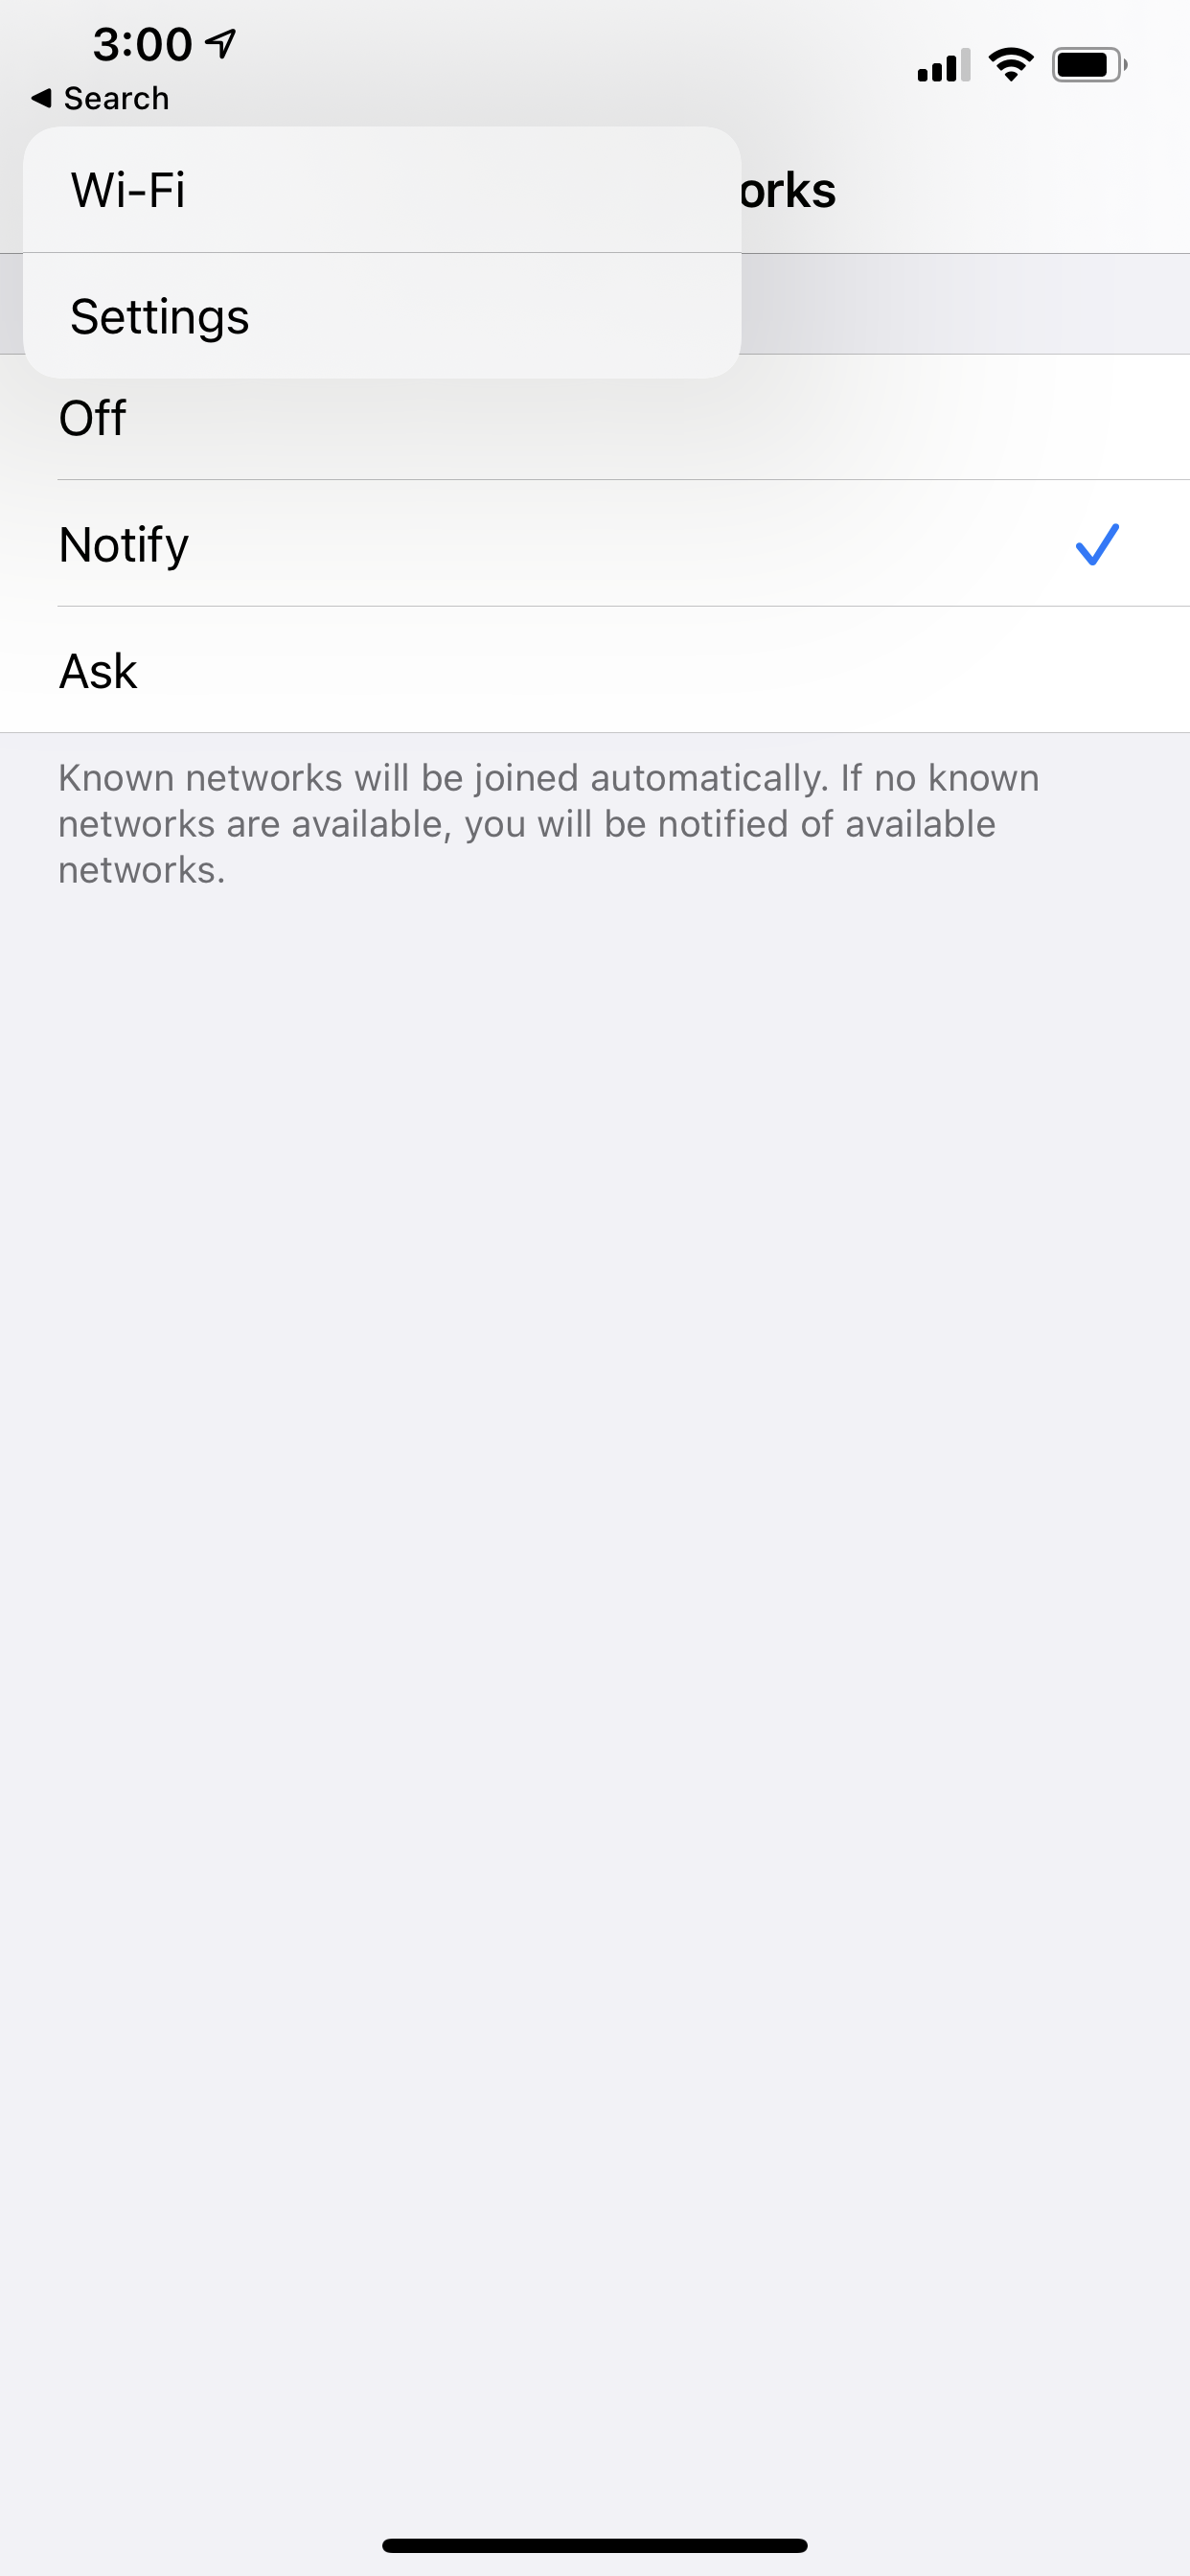
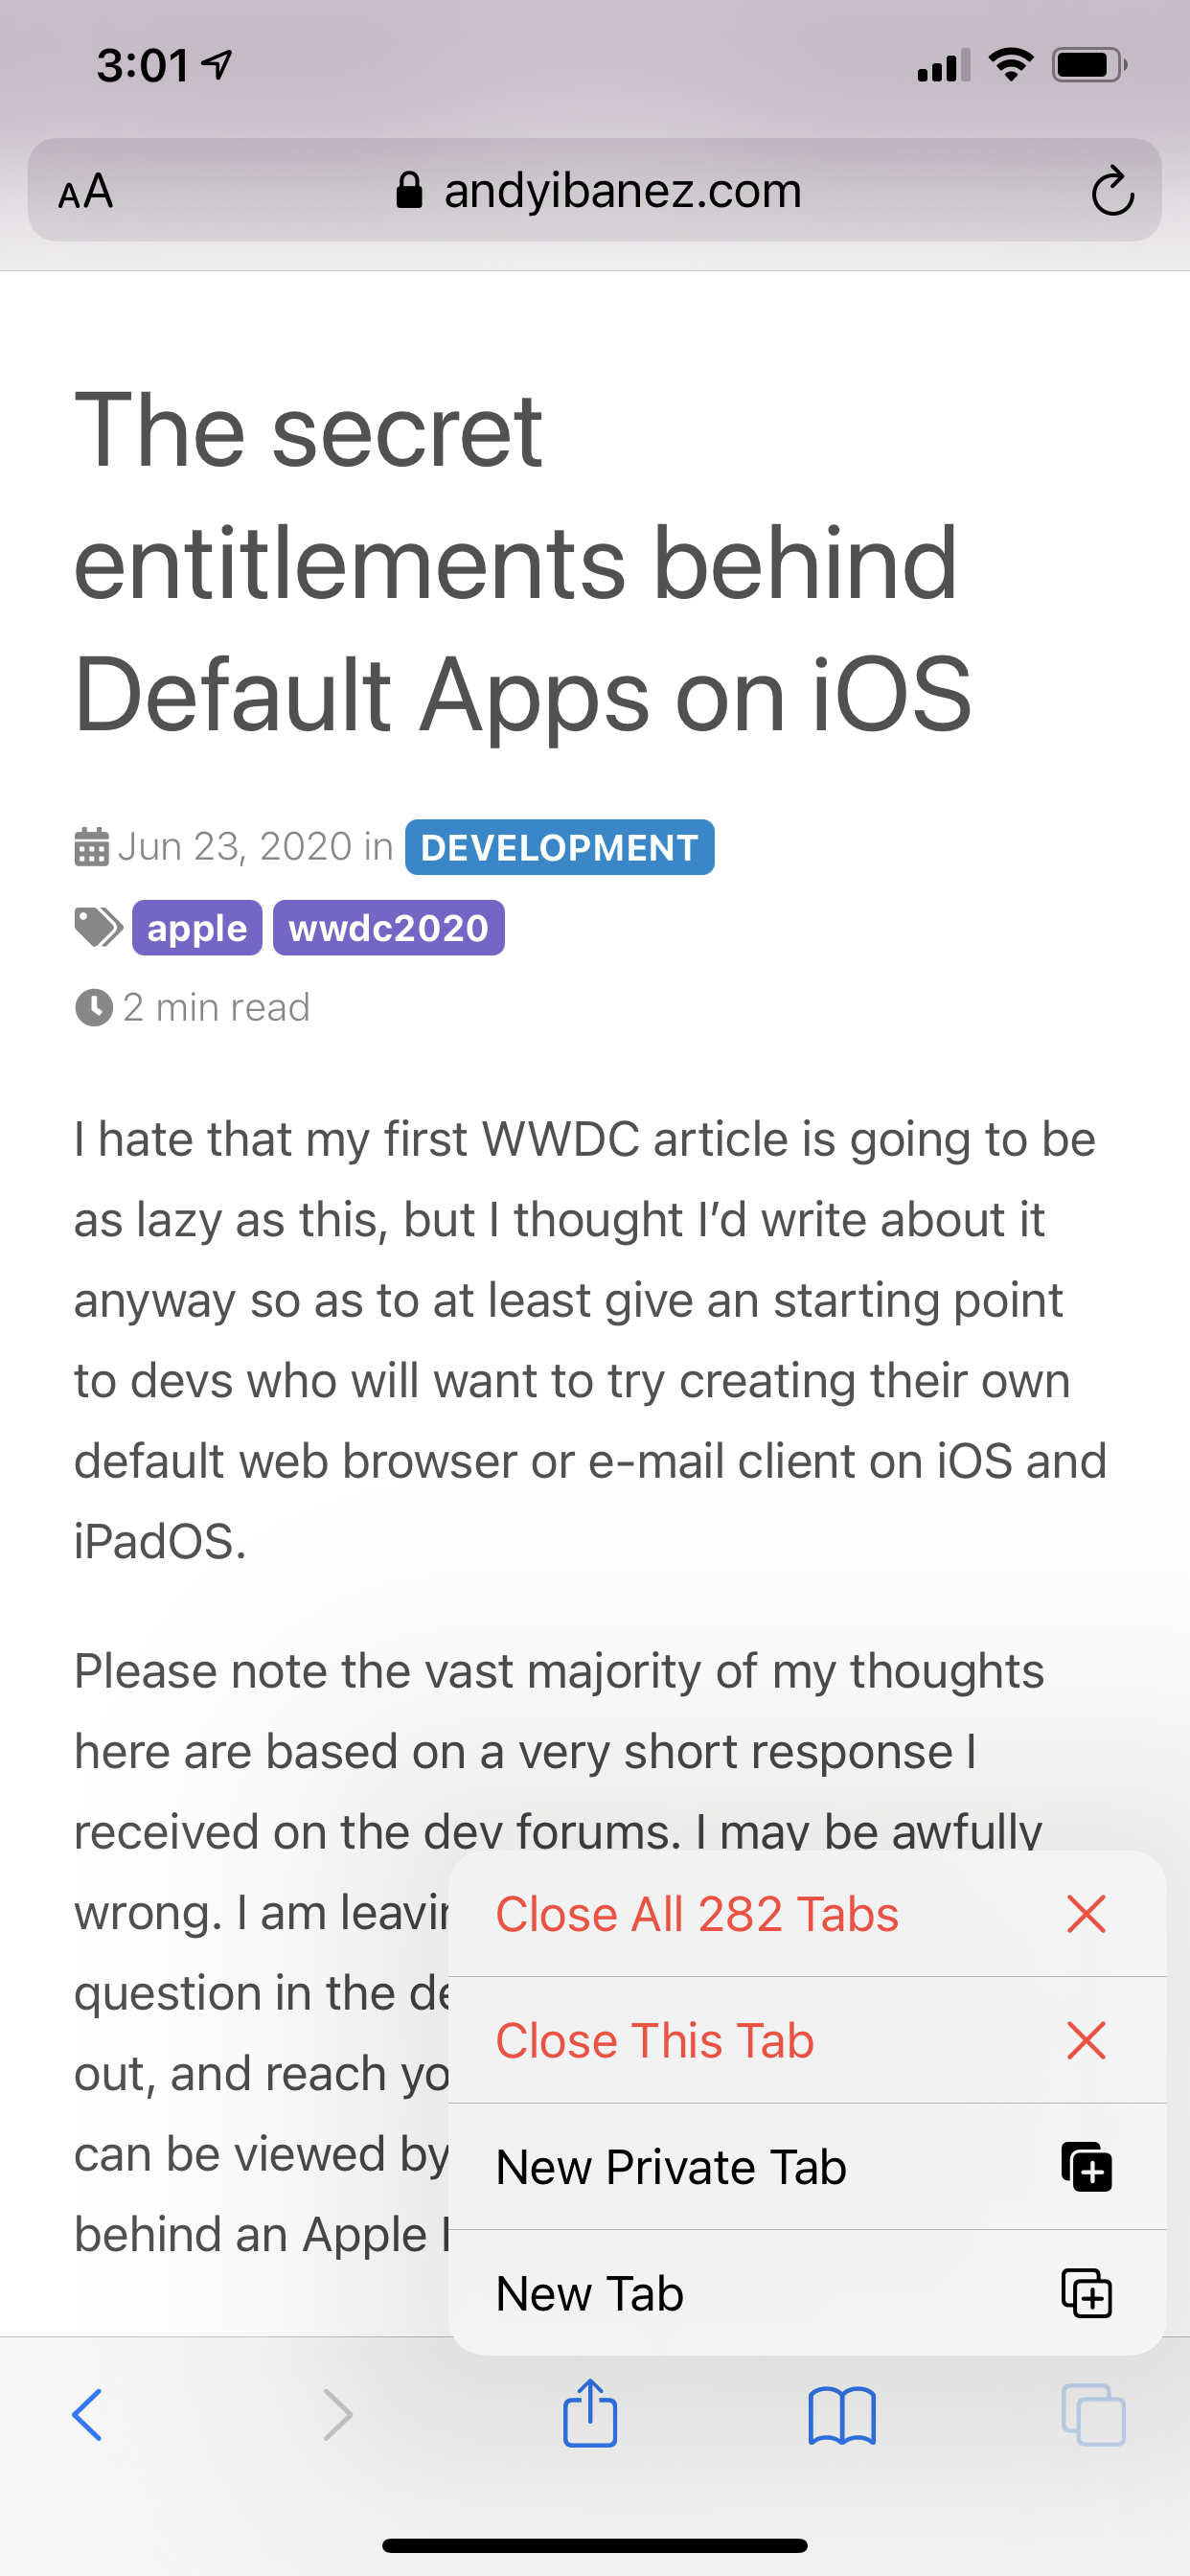
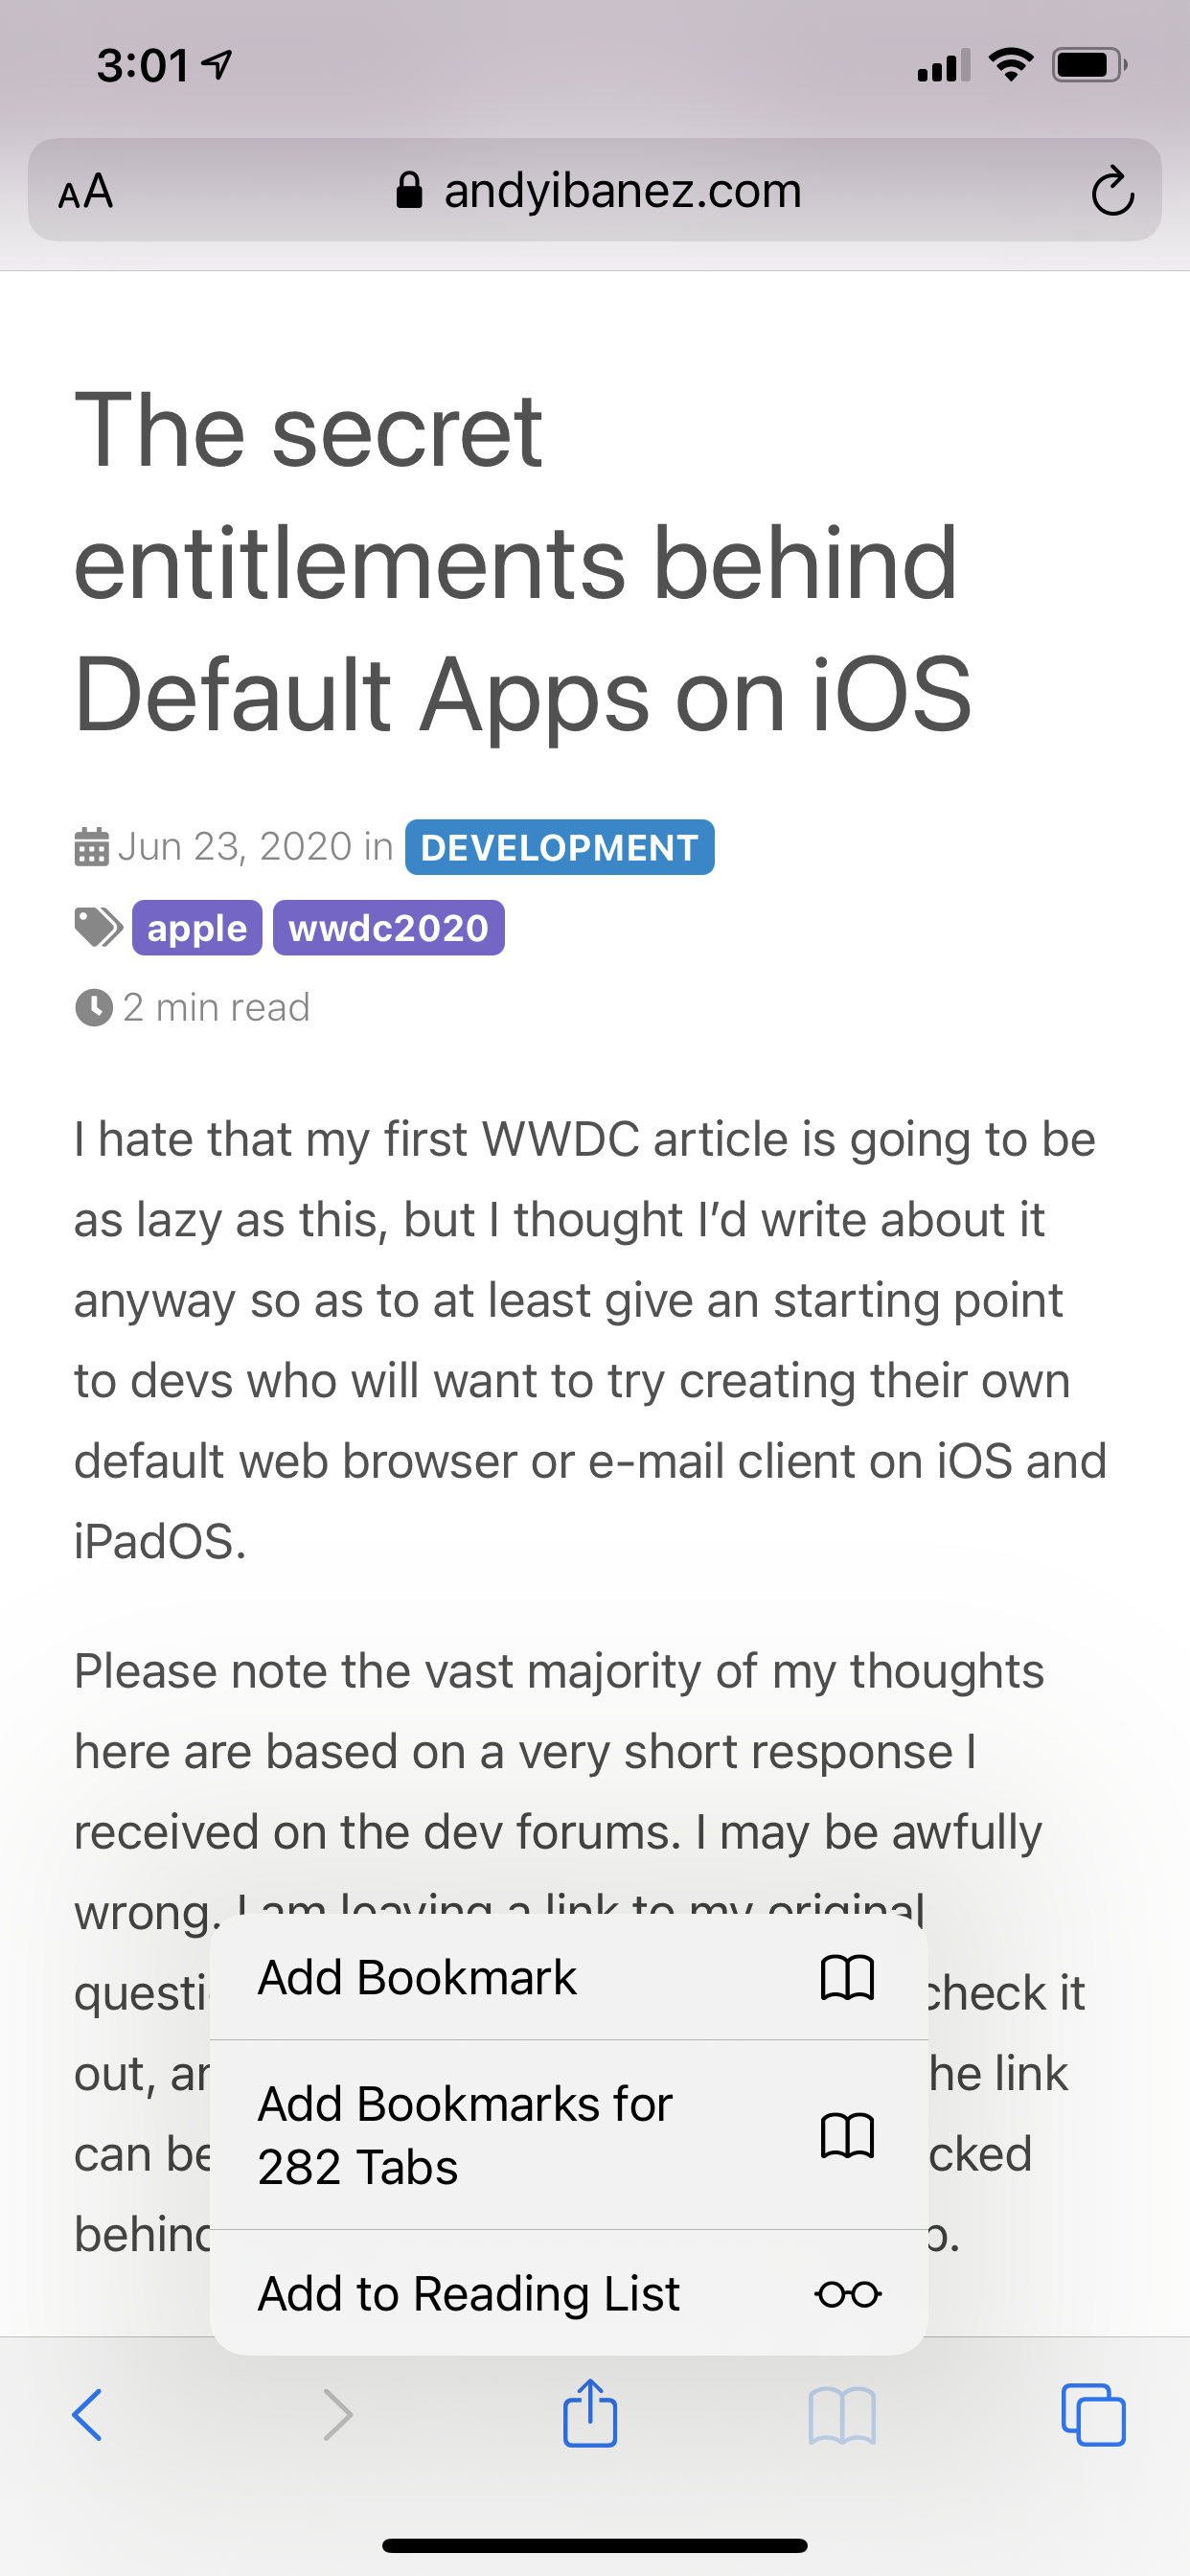

Essentially, we can now attach a menu to UIBarButtonItems and other UI APIs to do additional settings. By default, you can long-press a back button and it will show you a stack of views you are currently on top of, so you can quickly go back to another view. In Safari, we can quickly do more actions on our tabs, check our history, and even see our navigation history of the specific tab thanks to this API.
Quick Introduction to UIMenu.
A menu represents a series of actions we can perform. In its simplest form, the API consists of a UIMenu, which lets us define menus; and UIAction (subclass of UIMenuElement, which is the action we want to perform when our menu item is selected. Menus can be used in a wide array of places in the system, but we will explore how to use it in a few places as introduced in iOS 14.
UIMenu with UIBarButtonItems
Using the new features of UIMenu is possible with UIBarButtonItems regardless of whether they are in the navigation bar or toolbar. To adopt this functionality, UIBarButtonItem has twi new initializers:
init(title:image:primaryAction:menusystemItem:primaryAction:menu
The primaryAction allows you to specify the UIAction that should be triggered when the user simply taps the item. You can think of it as a replacement (finally) for the default target/action we have had to deal with for years. This property can be nil, and when it is missing, the system will automatically show your menu when your user taps on it. If there is a default action, you can long-press the item to show the menu.
The menu parameter is a UIMenu item. This UIMenu item has a property called children which is an array of all the UIActionss you can call. You can configure your actions as you wish, assigning them text, images, and more properties.
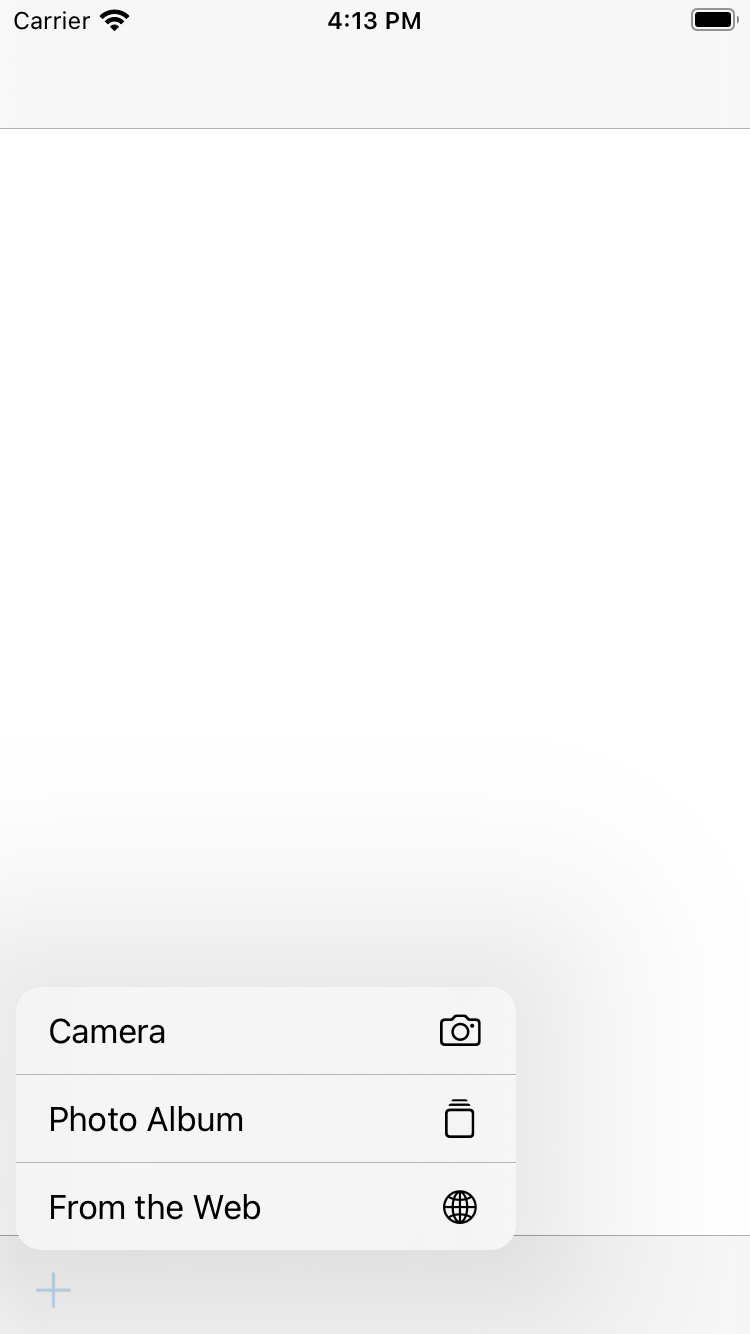
In the below example, we will create a bar button item on the toolbar which by default it will do nothing, so the system will show our menu for us:
override func viewDidAppear(_ animated: Bool) {
  super.viewDidAppear(animated)
  navigationController?.isToolbarHidden = false
  let addNewItem = UIBarButtonItem(systemItem: .add, primaryAction: nil, menu: createMenu())
  toolbarItems = [addNewItem]
}

func createMenu() -> UIMenu {

  let photoAction = UIAction(
    title: "Camera",
    image: UIImage(systemName: "camera")
  ) { (_) in
    print("New Photo from Camera")
  }

  let albumAction = UIAction(
    title: "Photo Album",
    image: UIImage(systemName: "square.stack")
  ) { (_) in
    print("Photo from photo album")
  }

  let fromWebAction = UIAction(
    title: "From the Web",
    image: UIImage(systemName: "globe")
  ) { (_) in
    print("Photo from the internet")
  }

  let menuActions = [photoAction, albumAction, fromWebAction]

  let addNewMenu = UIMenu(
    title: "",
    children: menuActions)

  return addNewMenu
}
When you tap the bar button item, it will neashow your menu like this:
Try adding a primaryAction now:
let defaultMenuAction = UIAction(title: "") { (_) in
    print("A default action has been triggered!")
}

let addNewItem = UIBarButtonItem(systemItem: .add, primaryAction: defaultMenuAction, menu: createMenu())
toolbarItems = [addNewItem]
Now when you tap your item, the default action is called. If you long press it, you will see your menu. Incredibly neat and useful! This is one of my favorite features.
And to make it even better, you can get completely get rid of the non-Swifty target/action model we have used since times memorial, but providing a primary action, and passing in nil for the menu.
let dismissAction = UIAction(title: "") { (_) in
    self.dismiss(animated: true, completion: nil)
}

let dismissItem = UIBarButtonItem(
    title: nil,
    image: UIImage(systemName: "xmark"),
    primaryAction: dismissAction,
    menu: nil)
If having a menu on bar button items was blowing me away, I’m more blown away by the fact that we can finally modernize some old code by getting rid of target/action!
UIDeferredMenuElement
Introduced in iOS 14, this object allows you, asynchronously, build up your UIMenu. This is very cool, because it allows you to build your menu based on items from a web service or any other lengthy operations.
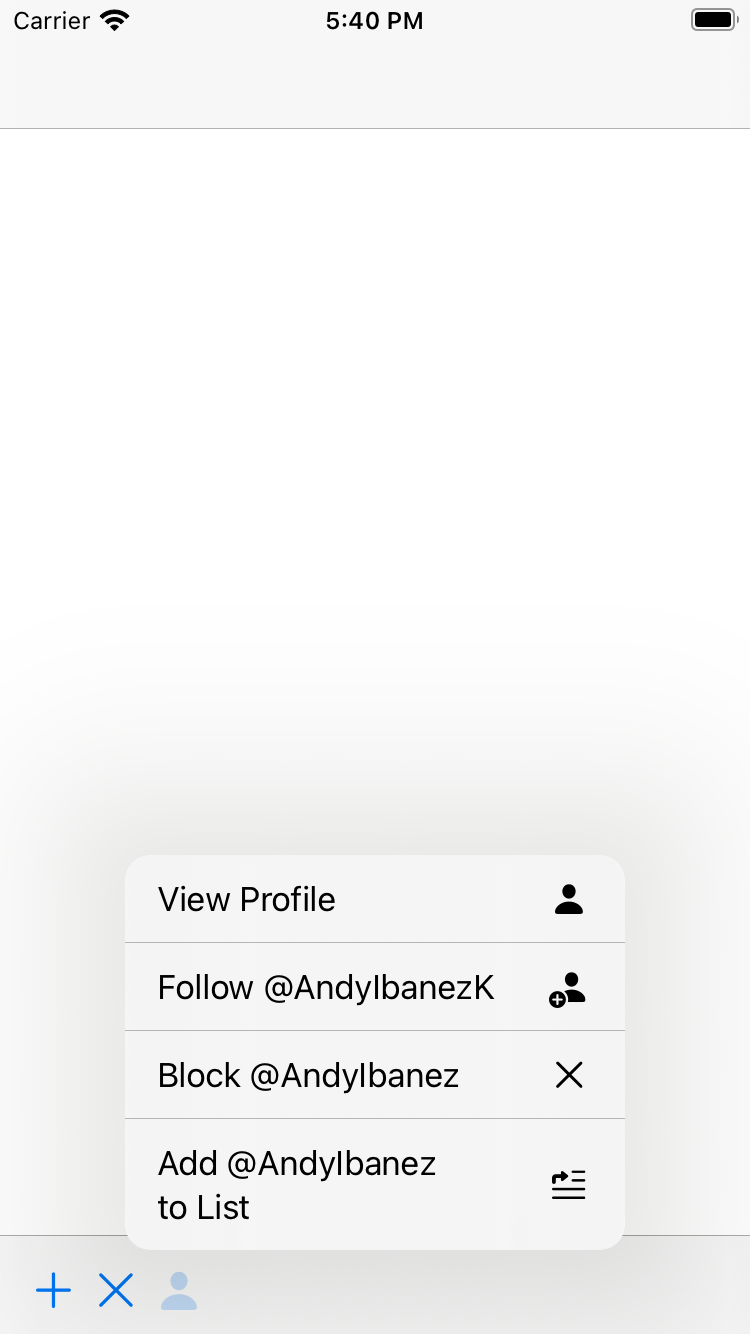
To show how this works, we are going to pretent we are fetching a dynamic menu from an API that lets us follow, list, and block users.
To do this, I am hosting a simple JSON file on this GitHub Gist, and it looks like this:
[
    {
        "title": "Follow @AndyIbanezK",
        "icon": "person.badge.plus.fill"
    },
    {
        "title": "Block @AndyIbanez",
        "icon": "xmark"
    },
    {
        "title": "Add @AndyIbanez to List",
        "icon": "text.insert"
    }
]
title is the text that will be displayed by our menu elements, and icon is the SF Icon to display.
Our menu struct looks like this:
struct RemoteItem: Codable {
    let title: String
    let icon: String
}
Now, to consume this service:
func menuItemsForUser(completionHandler: @escaping (_ menuItems: [RemoteItem]?) -> Void) {
    let urlSession = URLSession(configuration: .default)
    let url = URL(string: "https://gist.githubusercontent.com/AndyIbanez/3e35465072db98848c2416fd588708a8/raw/07fdec07b1ee8a0068b47b8b79cd328ef69d0589/deferred_menu_example_jso")!

    urlSession.dataTask(with: url) { (data, _, _) in
        DispatchQueue.main.async {
            if let data = data {
                let menuItems = try? JSONDecoder().decode([RemoteItem].self, from: data)
                completionHandler(menuItems)
            } else {
                completionHandler(nil)
            }
        }
    }.resume()
}
We will use try? when trying to parse to avoid error handling. You will naturally to do this properly in a real app.
Finally, we will use this when creating our UIDeferredMenuElement object. This object takes a closure as its argument. We we will call the completion handler when we are done fetching the items.
let dynamicElements = UIDeferredMenuElement { completion in // 1
self.menuItemsForUser { (items) in
if let items = items { // 2
let actions = items.map { item in // 3
UIAction(title: item.title, image: UIImage(systemName: item.icon)) { _ in
print("\(item.title) tapped")
}
}
completion(actions) // 4
} else {
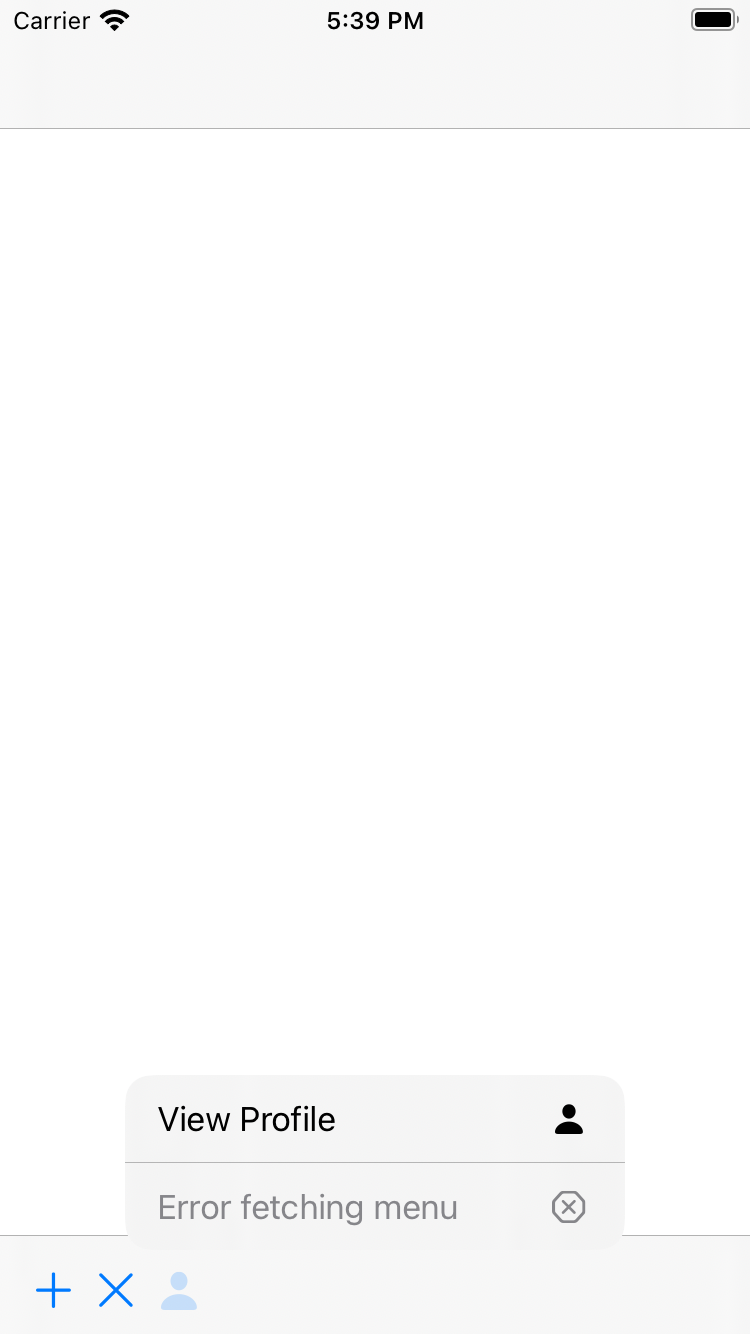
let action = UIAction(
title: "Error fetching menu",
image: UIImage(systemName: "xmark.octagon"),
attributes: [.disabled]) { _ in }
completion([action]) // 5
}
}
}
And to handle the menu display:
let userMenu = UIMenu(
    title: "",
    children: [dynamicElements])

let userItem = UIBarButtonItem(
    title: nil,
    image: UIImage(systemName: "person.fill"),
    primaryAction: nil,
    menu: userMenu)

toolbarItems? += [userItem]
Basically, what we are doing here:
- Create a new
UIDeferredMenuElementobject, with a closure and completion handler. - Unwrap the items if they exist.
- If they exist, we will map our
RemoteItems intoUIActions. - Call the completion handler with our array of
UIActions. - If force unwrapping fails, we will create a new menu element that will be disabled to tell our users that loading the menu has failed.
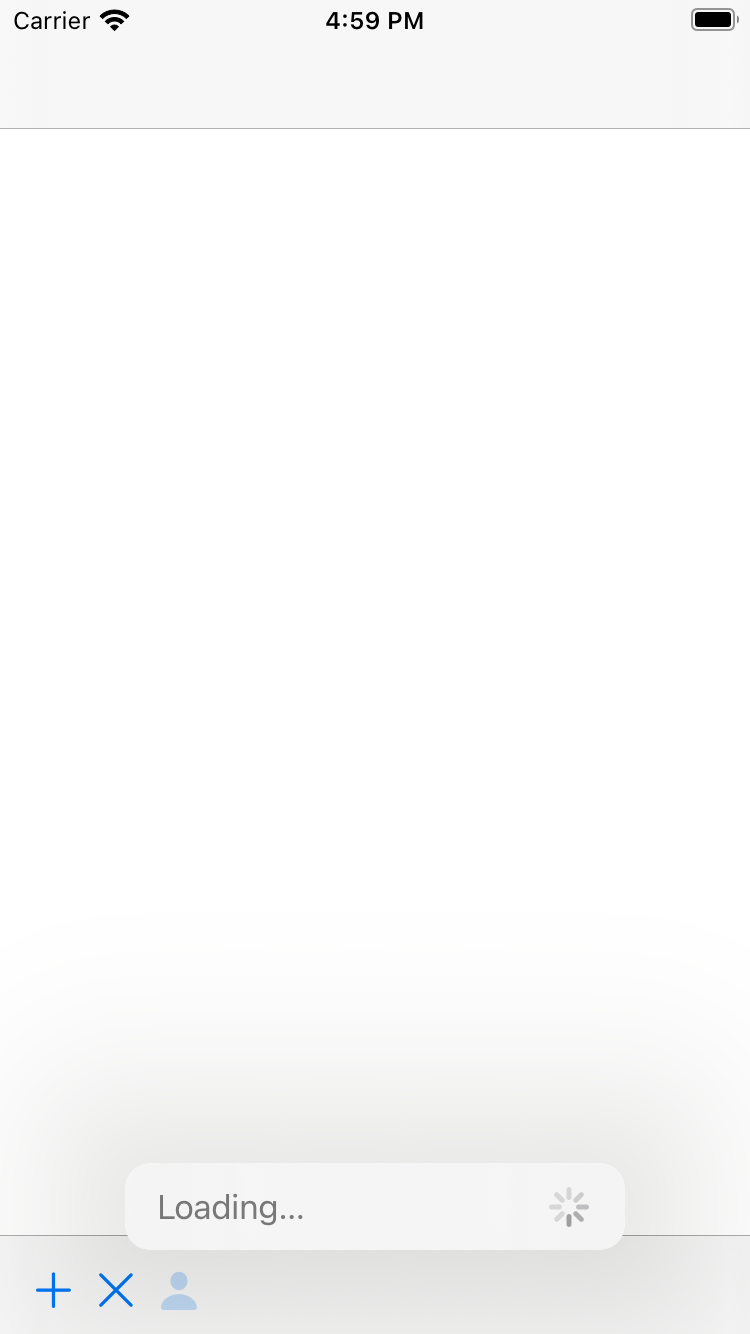
When you invoke your menu, you will see this first:
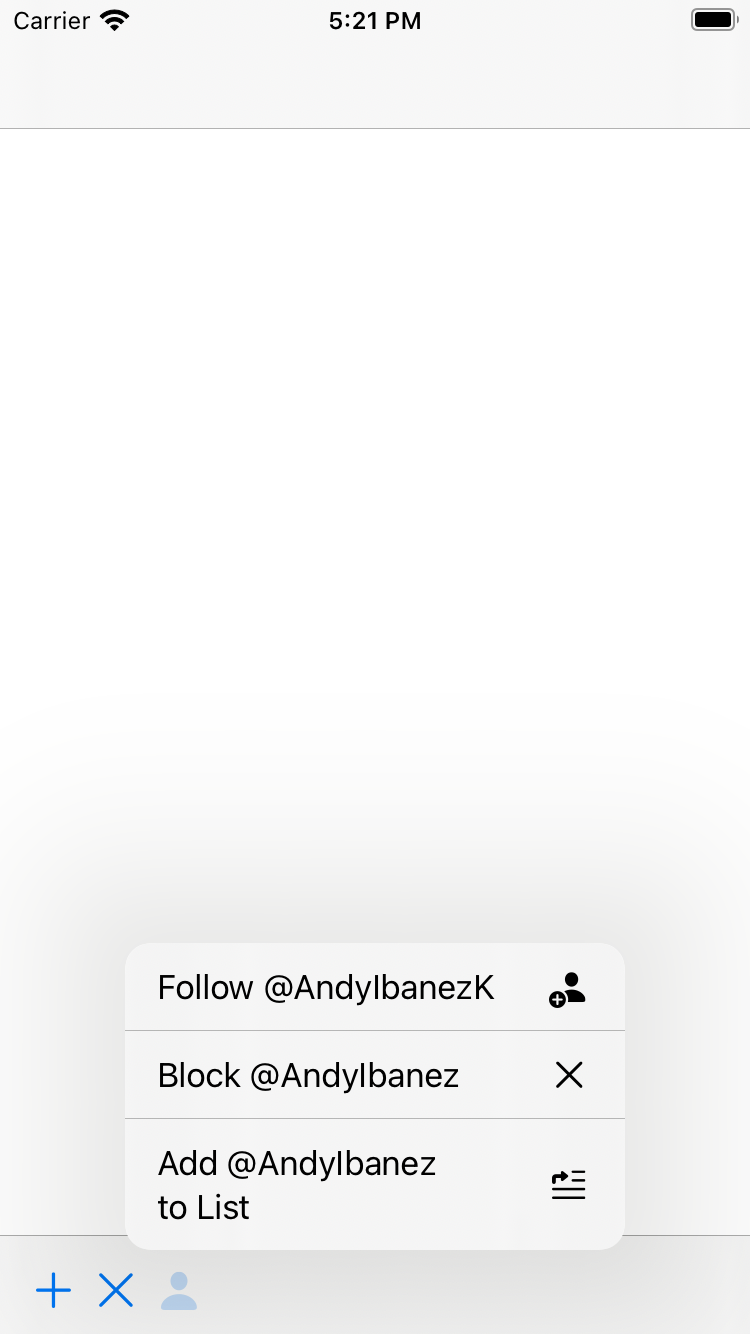
If the menu loads without an issue, you will see it just fine:
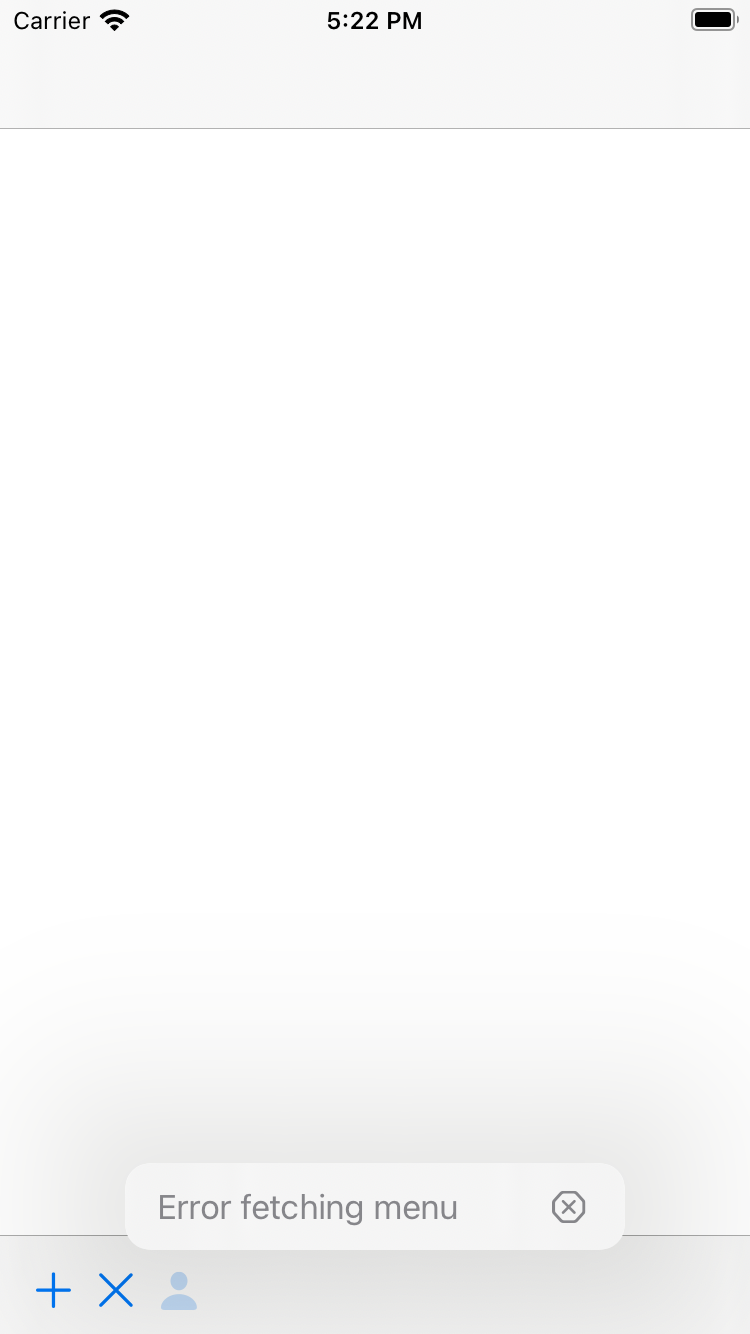
Finally, if the menu fails to load (you can test this easily by changing the URL a little), your user will see this:
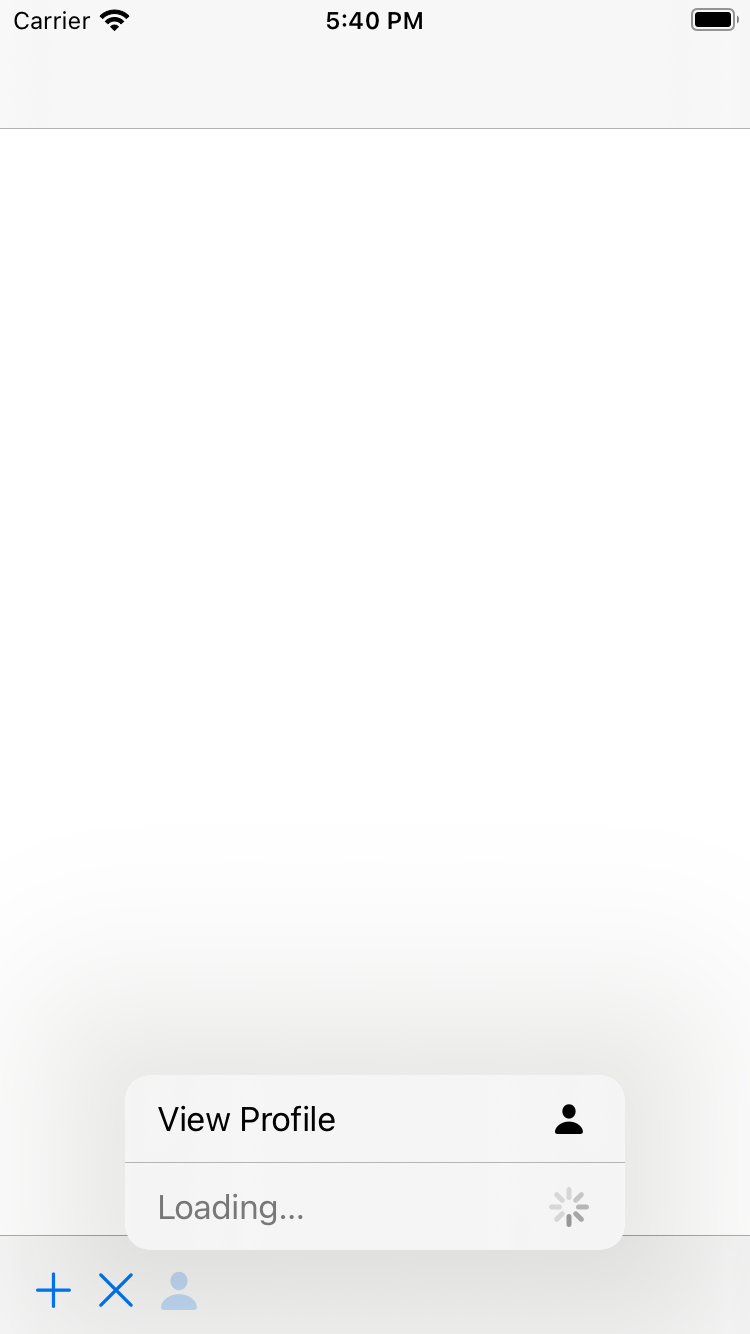
One last thing before we wrap up this article. You can combine static menu elements with dynamic ones just like this:
let viewProfileAction = UIAction(
    title: "View Profile",
    image: UIImage(systemName: "person.fill")) { (_) in
    print("View profile selected")
}

let userMenu = UIMenu(
    title: "",
    children: [viewProfileAction, dynamicElements])
Conclusion
UIMenu brings a bunch of interesting and unexpected features. Being able to dynamically load menu elements and mix them with static elements is a great feature I didn’t know I wanted. This article may or may not be updated as I learn more about the new features introduced for UIMenu and related APIs.