Writing Command Line Tools in Swift Using ArgumentParser, Part 1: Introduction & Basic Usage
Published on
A few weeks ago, the Swift project introduced the ArgumentParser package. This package makes it easy to write command line tools by providing automatic parsing, documentation generation, and more.
In this article, we will explore ArgumentParser, and how we can start building some command line tools with it, using the basic building blocks, which are three Property Wrappers called Argument, Option, and Flag.
Project Configuration
Open Xcode and create a new project of type “Command Line Tool”. You cannot use this project type for iOS/iPadOS, so if you don’t find it, head over to the Mac tab.
Go through the rest of the prompts, and when you are done, click over your project’s blueprint, and under the “Project” section (NOT targets), click your project blueprint again. You will now see the “Swift Packages” tab. Click the “+” button and add the following package:
https://github.com/apple/swift-argument-parser

We can now write some code.
Writing A Simple Command Line Tool
We will see how ArgumentParser works by creating a simple program that lets us count the characters in a string. While it sounds simple, we will add more options as we go along.
The package allows you to create tools very easily that follow the conventions you’d find in most command line tools. You can create tools that take arguments, options, and flags, and it exposes all this functionality through Property Wrappers. The framework also takes care of a lot of automatic configuration for you. For example, it can automatically create short-letter options for your commands (-c as another way of calling --count). In This section we will explore the three property wrappers that make ArgumentParser: @Argument, @Option, and @Flag.
The @Argument Property Wrapper
A command line tool is a struct that conforms to the ParsableCommand protocol. This protocol does a lot of magic behind the scenes for us.
struct CharacterCount: ParsableCommand {

  @Argument(help: "String to count the characters of") var string: String

  func run() throws {
    print(string.count)
  }
}

CharacterCount.main()
This command line tool will allow us to count the number of characters in a string. The Argument property wrapper indicates that the property should be retrieved from the command line. The name of the argument is derived from its variable name marked as @Argument. Swift also takes care of the data type for us thanks to its static typing. If you pass in a number to this tool, Swift will treat it as a string, but if you specify the argument to be an Int instead, Swift will treat it as such and fail when it can’t detect it as a number. The help in @Argument will synthesize a description for the argument when the user views your command’s help page.
You need to call your ParsableCommand’s main() method in order to run your tool.
Testing Your Command Line Tool
You may be tempted to press Run in Xcode to use your tool, just to find that Xcode terminates it immediately with an error similar to this:
Error: Missing expected argument '<string>'
Usage: character-count <string>
Program ended with exit code: 1
First, notice how Xcode is telling you it can’t run your tool because <string> is missing. This is part of the functionality you get for free.
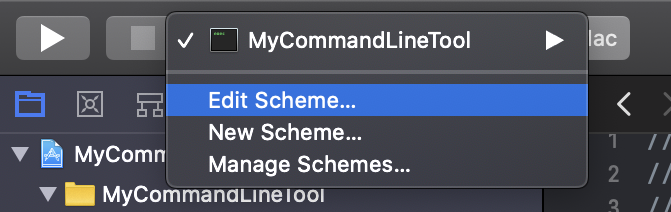
To actually run your program, you have two options. The first one, is to edit your “Run” scheme to launch your tool with command line arguments. To do this, you can long-click your command tool name near the Run button in Xcode and select Edit Scheme:

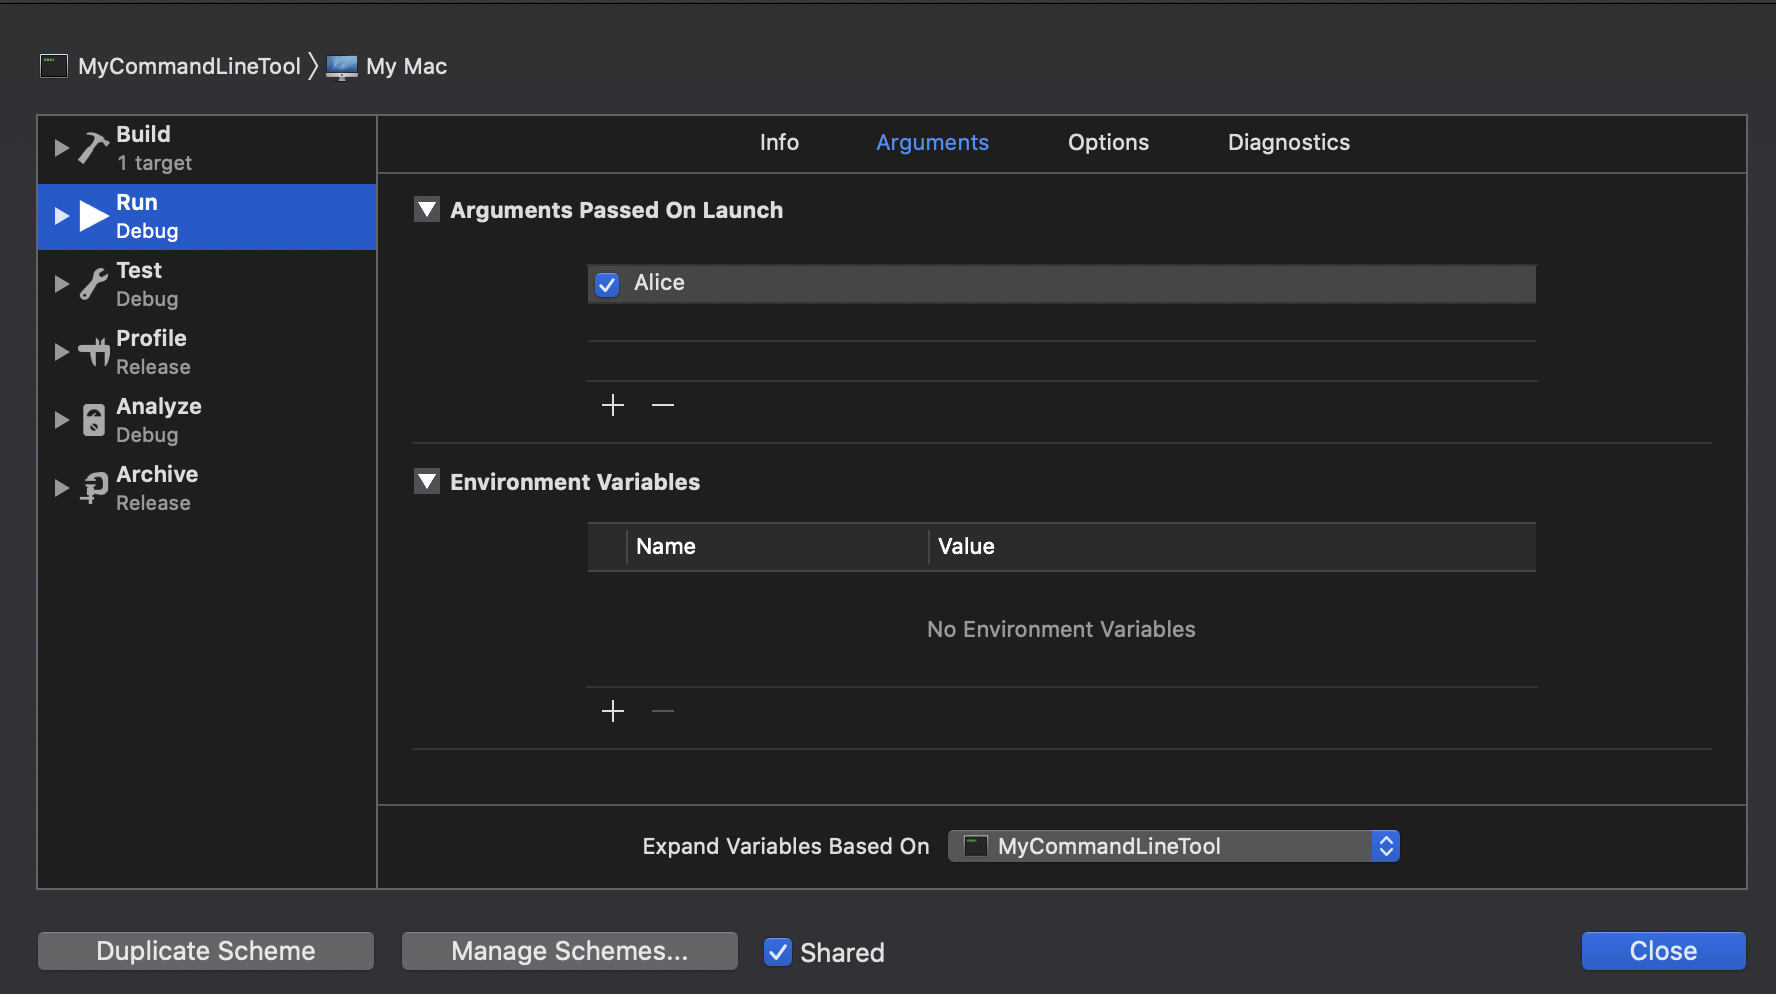
You will see this window where you can pass in your arguments. I’m passing “Alice” as a string.
Now when you run your command line tool, it will show the following in Xcode.
5
Program ended with exit code: 0
… But this is actually a very annoying way to do it. You would have to modify the launch arguments every time you want to test something new.
A better way to test your command line tool is to go to Xcode, File > Preferences > Locations. Open the Derived Data location, and locate the folder for your tool. The folder you are looking for is called “MyCommandLineTool-egtvueadzoycpmgvxbashkvkircq. Inside your folder, dig all the way down, using the Terminal, to Build/Products/Debug (my full path was /Users/andyibanez/Library/Developer/Xcode/DerivedData/MyCommandLineTool-egtvueadzoycpmgvxbashkvkircq/Build/Products/Debug. Your command line tool’s binary is here, and you can run it as so:
./MyCommandLineTool Alice
So now instead of having to modify the arguments through Xcode, you can directly launch your tool via the Terminal, and have a feel of how it will work in the real world.
Another handy tip, and part of all the functionality you get for free, is a help page and usage instructions generated for you. If you just run:
./MyCommandLine
With no arguments, the command line will show:
Error: Missing expected argument '<string>'
Usage: character-count <string>
Even better, you get a free help page displayed when you use the --help flag.
./MyCommandLineTool --help
ARGUMENTS:
  <string>                String to count the characters of

OPTIONS:
  -h, --help              Show help information.
The description of the <string> argument comes directly from what you specified as the help parameter in the @Argument property wrapper.
As you can see, ArgumentParser provides us with a a lot of free functionality out of the box. And we are just getting started.
More @Argument Usage
Command line tools can take a variable amount of @Arguments, though keep in mind you must have at least one.
struct CharacterCount: ParsableCommand {

  @Argument(help: "String to count the characters of") var string: String
  @Argument(help: "A second string to count the characters of") var string2: String

  func run() throws {
    print(string.count)
    print(string2.count)
  }
}
./MyCommandLineTool Pullip Alice
6
5
The above example will require you pass in both <string> and <string2>, and if you just pass in one, it will complain <string2> is missing. But you can mark Arguments as optionals, and they no longer become mandatory.
struct CharacterCount: ParsableCommand {

  @Argument(help: "String to count the characters of") var string: String
  @Argument(help: "A second string to count the characters of") var string2: String?

  func run() throws {
    print(string.count)

    if let str2 = string2 {
      print(str2.count)
    }
  }
}
./MyCommandLineTool Pullip
6
And yes, you can just specify an array of strings as the argument, and it will work as you expect.:
struct CharacterCount: ParsableCommand {

  @Argument(help: "Strings to count the characters of") var strings: [String]

  func run() throws {
    strings.forEach { print($0.count) }
  }
}
./MyCommandLineTool Pullip Classical Alice
6
9
5
Keeping in mind that, if you want to treat “Pullip Classical Alice” as a single string, you have to wrap it in quotes:
./MyCommandLineTool "Pullip Classical Alice"
22
You can also use any kind of data type and it will be parsed accordingly:
@Argument(help: "String to count the characters of") var string: String
@Argument(help: "Multiplier") var multiplier: Int

func run() throws {
	print(string.count * multiplier)
}
Arguments are the basic blocks of command line tools, and ArgumentParser makes it very easy to parse them out.
Transforming Arguments
Because the package will receive everything as strings first, you have the opportunity to transform arguments before they are ready to be used. For this, the @Argument property wrapper has an optional transform property you can use.
Suppose you want to make a string longer when you receive. You can do something like this:
@Argument(help: "String to count the characters of", transform: ({ return "\($0)makeItLonger" })) var string: String
./MyCommandLineTool Alice
17
Very useful in many cases. You could, for example, transform your argument into a URL if you let users perform network requests through your tool:
@Argument(help: "URL to retrieve", transform: ({ return URL(string: $0)!})) var string: URL
Configurable Options via the @Option Property Wrapper
Options are key-value pairs that allow users to modify the behavior of their command line tool.
In a previous example, we used a multiplier argument to multiply the result of count by something else. While it works, it semantically makes no sense to use multiplier this way. Instead, we should use it as an @Option, that the user can specify if they want:
@Option(help: "The number to multiply the count against.") var multiplier: Int
The code above will force users to provide the multiply parameter, which we can do as so:
./MyCommandLineTool Alice --multiplier 3
15
But there’s more! By default, options will provide a lot of free functionality. You can call your option with an equal sign between its name and its value:
./MyCommandLineTool Alice --multiplier=3
Doing More With @Option
@Option actually has a lot of configuration options. Way more than @Argument.
Configuring an @Option’s Name
When you use @Option, the name of the option will be exposed in the tool as the name of the variable. But we can change it by using the name property of the Property Wrapper, which takes a NameSpecification.
The .long value will grab the variable name directly and expose it as such, separating words with a hyphen when the framework detects the option has multiple words in its name. This is the default, which exposes our multiply variable as --multiply.
The .short value will create an option which starts with the first letter of the variable name. In other words, our multiply variable will simply be exported as a -m option. Notice the single hyphen. A convention used for command line tools is, options that have more than one letter have two hyphens, and those that are a single letter have a single hyphen.
@Option(name: .short, help: "The number to multiply the count against.") var multiplier: Int
./MyCommandLineTool Alice -m 3
15
The --help page also reflects this:
andyibanez@Andys-iMac Debug % ./MyCommandLineTool Alice --help
USAGE: character-count <string> -m <m>

ARGUMENTS:
  <string>                String to count the characters of

OPTIONS:
  -m <m>                  The number to multiply the count against.
  -h, --help              Show help information.
Apparently, the framework cannot do anything when it finds two options that start with m and you are using .short. I tried adding a second option whose name starts with m, and I couldn’t get it to run by specifying two ms when calling the command, so keep in that mind.
To go around that, NameSpecification also provides .customShort(string:) and .customLong(string:), which let you change completely the names of the options when exposed to the command line.
@Option(name: .customLong("multi"), help: "The number to multiply the count against.") var multiplier: Int
./MyCommandLineTool Alice --multi 3
15
@Option(name: .customShort("w"), help: "The number to multiply the count against.") var multiplier: Int
./MyCommandLineTool Alice -w 3
15
Command line tools usually offer both long and short names for their options. You can do this as well, by using the .shortAndLong value.
@Option(name: .shortAndLong, help: "The number to multiply the count against.") var multiplier: Int
./MyCommandLineTool --help
USAGE: character-count <string> --multiplier <multiplier>

ARGUMENTS:
  <string>                String to count the characters of

OPTIONS:
  -m, --multiplier <multiplier>
                          The number to multiply the count against.
  -h, --help              Show help information.
If you have looked at the autocomplete suggestions, you may be aware that there’s no way to specify both a .customShort and .customLong at the same time. But you can actually pass in an array of options, so really, you can add as many names as you want to an option.
To use both .customLong and .customShort, you can use this:
@Option(name: [.customShort("w"), .customLong("multi")], help: "The number to multiply the count against.") var multiplier: Int
But you can specify a bunch of other names as well. If you think users are likely to use many names for multiplier, you could use something like this:
@Option(
	name: [
    .customLong("multiplier"),
    .customLong("multi"),
    .customLong("mult"),
    .customLong("multiplicador"),
    .customLong("multiplierr")],
  help: "The number to multiply the count against.") var multiplier: Int
andyibanez@Andys-iMac Debug % ./MyCommandLineTool Alice --help
USAGE: character-count <string> --multiplierr <multiplierr>

ARGUMENTS:
  <string>                String to count the characters of

OPTIONS:
  --mult, --multi, --multiplicador, --multiplier, --multiplierr <multiplierr>
                          The number to multiply the count against.
  -h, --help              Show help information.
Needless to say, you should only do this in exceptional cases.
Passing In Default Values
@Option has a default parameter you can use to specify a default value when it is missing. Its usage is pretty straightforward:
@Option(default: 1, help: "The number to multiply the count against.") var multiplier: Int
Your help page will also reflect this.
  --multiplier <multiplier>
                          The number to multiply the count against. (default: 1)
Transforming Options
Just like with @Argument, we can specify a closure to call when we receive the option to operate on it and transform it before our tool can use it.
In the following example, we will check the value of the option. If we receive 0, we will turn it into 1. Any other value will be used as-is.
@Option(
  default: 1,
  help: "The number to multiply the count against.",
  transform: ({ Int($0)! == 0 ? 1 : Int($0)! })) var multiplier: Int
Be careful of your optionals, because the framework will pass you the value as it was received, so there’s no guarantee it will actually be a string.
Configurable Options With @Flag
Very similar to @Option, @Flag allows your users to change how your command line tool behaves. The difference is that @Option works with key-value pairs, whereas the existence of a @Flag tells us if a value exists or not. Usually used with Booleans, @Flag allows us to create options that can simply be toggled by our users.
struct CharacterCount: ParsableCommand {
  @Argument(help: "String to count the characters of") var string: String

  @Flag(help: "When set, it ignores whitespace characters") var ignoringWhiteSpace: Bool

  func run() throws {
    print(ignoringWhiteSpace ? string.filter { $0 != " " }.count : string.count)
  }
}
./MyCommandLineTool "Pullip Classical Alice" --ignoring-white-space
20
Just by specifying --ignoring-white-space, the ignoringWhiteSpace variable becomes true. Also, flags cannot be marked as optional.
Configuring @Flags.
Just like you can configure @Argument and @Option, you can configure @Flags.
Specifying Names for Your Flags
You can configure a flag’s name in the same way you can modify the name of an option. Pass in the name parameter and you can use the same NameSpecification as in @Option.
@Flag(name: .short, help: "When set, it ignores whitespace characters") var ignoringWhiteSpace: Bool
Specifying Prefixes
You can create matching flag names so it’s always explicit whether your user wants to enable a flag or not.
@Flag(inversion: .prefixedEnableDisable, help: "When set, it ignores whitespace characters") var ignoringWhiteSpace: Bool
andyibanez@Andys-iMac Debug % ./MyCommandLineTool --help
USAGE: character-count <string> [--enable-ignoring-white-space] [--disable-ignoring-white-space]

ARGUMENTS:
  <string>                String to count the characters of

OPTIONS:
  --enable-ignoring-white-space/--disable-ignoring-white-space
                          When set, it ignores whitespace characters (default:
                          false)
  -h, --help              Show help information.
This will create two flags for our @Flag, and prefix them with enabled- or disabled- so the user always has to specify one.
Flags with Enumerations
@Flags can work with enumerations so you can allow users to pick more options, but limiting the number parameters that the flags can take.
To do this, your enumeration must conform to a RawRepresentable (such as String) and with CaseIterable. The below example will let us specify what characters we care about.
struct CharacterCount: ParsableCommand {

  enum CharSet: String, CaseIterable {
    case whitespace
    case numbers
    case vowels
  }

  @Argument(help: "String to count the characters of") var string: String
  @Flag(help: "Character sets to ignore") var characterSets: [CharSet]

  func run() throws {
    var allChars = [String]()
    if characterSets.contains(.whitespace) {
      string.forEach { if $0 == " " { allChars += [String($0)] } }
    }

    if characterSets.contains(.numbers) {
      let numbers = (0...9).map { "\($0)" }
      string.forEach { if numbers.contains(String($0)) { allChars += [String($0)] } }
    }

    if characterSets.contains(.vowels) {
      let vowels = ["a", "e", "i", "o", "u"]
      string.forEach { if vowels.contains(String($0.lowercased())) { allChars += [String($0)] } }
    }

    print(allChars.count)
  }
}
./MyCommandLineTool "Pullip Al1ce" --whitespace --numbers
2
The value names (--whitespace, --numbers, etc) are derived from the raw values.
Conclusion
It looks like we covered a lot of ground here, but all we really covered is how to use the building blocks of ArgumentParser. @Argument, @Option, and @Flag are used to create command line tools, and they provide a lot of functionality for free, all the way from parsing to documentation generation. We will be covering more about this package in the upcoming weeks, as it is one of the most exciting things in the community this year so far for me.